
PREMIER+™ Software Newsletter - September 2017
Welcome to the PREMIER+™ Newsletter. This month we will look at the creative possibilities of
PhotoStitch  ,
found in the PREMIER+™ ULTRA software package, and as an Express version in the Wizards tab in the PREMIER+™ Embroidery Extra module.
,
found in the PREMIER+™ ULTRA software package, and as an Express version in the Wizards tab in the PREMIER+™ Embroidery Extra module.
Inspired Icons
Inspired Icons
PhotoStitch
is found in the QuickLink toolbar at the bottom left of the PREMIER+™ embroidery window, or open the PhotoStitch Wizard. PhotoStitch has many icons for adjusting settings and defining parameters.
In the Choose Picture window, you can
Load a Picture  ,
Paste a Picture
,
Paste a Picture  (from the built-in picture editing software in PhotoStitch), or load From Scanner or
Camera
(from the built-in picture editing software in PhotoStitch), or load From Scanner or
Camera  .
.
The zooming toolbar in Rotate and Crop contains
Zoom In  ,
Zoom Out
,
Zoom Out  ,
Zoom to Fit
,
Zoom to Fit  ,
and Real Size
,
and Real Size  . Other icons in the same window are
Rotate
. Other icons in the same window are
Rotate  and Select All
  .
.
In Remove Background, tools for removing the background include
Flood Fill  ,
Large Eraser
,
Large Eraser  ,
Medium Eraser
,
Medium Eraser  ,
and Small Eraser
,
and Small Eraser  .
If you make a mistake, click
Undo
.
If you make a mistake, click
Undo  immediately, and it will undo the last step you made. If you want to undo all the steps and start over, click Reset.
In the Picture Options window, the
Select Eye  tool will help you filter out the red eyes sometimes found in photographs.
Once you have finished editing, you can Save the Picture
tool will help you filter out the red eyes sometimes found in photographs.
Once you have finished editing, you can Save the Picture  at its current revision so you can use it again without having to go through the editing process.
In Choose Thread Colors, use Color Selection  to determine
how many thread colors were used, and to increase or decrease the number of threads to preview how the design stitches. Make sure to Apply each time you change the number to update the Thread Color Preview picture.
to determine
how many thread colors were used, and to increase or decrease the number of threads to preview how the design stitches. Make sure to Apply each time you change the number to update the Thread Color Preview picture.
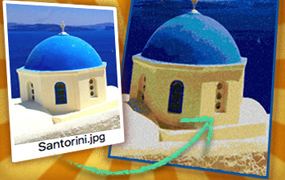
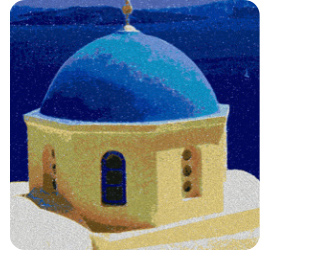
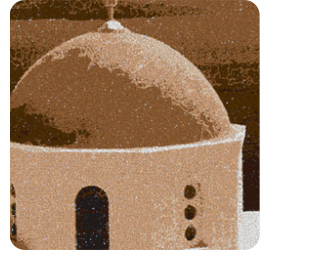
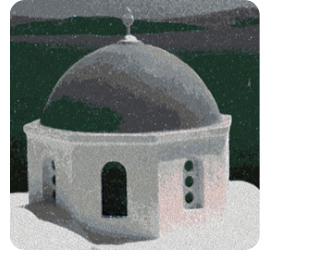
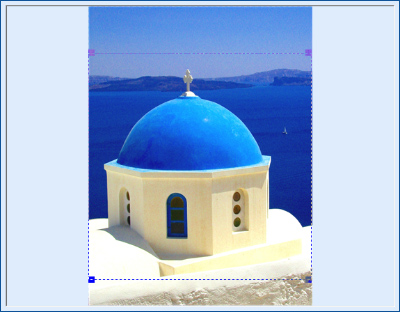
The image used to illustrate the different PhotoStitch styles is Santorini, found in Documents \Premier+ \Samples \Sketch \Pics3 \PhotoLandscapes.
Module Mystique
Module Mystique
Let's look at what the types of PhotoStitch and other features available in the PhotoStitch module in the PREMIER+™ ULTRA system, and the effects they produce, so you can quickly find the best Type for your photo or image!
Note: An Express version of PhotoStitch is found in the Wizards tab in the PREMIER+™ Embroidery Extra module.
When you select PhotoStitch
in the QuickLink toolbar in the Embroidery or other PREMIER+™ module, the PhotoStitch module will open to the PhotoStitch Wizard. Alternatively, open the PhotoStitch Wizard in PREMIER+™ Embroidery Extra.
In PhotoStitch
, the Wizard has six options. The preview image and the
Information  paragraph change with each selection to help you know what each stitch type will do.
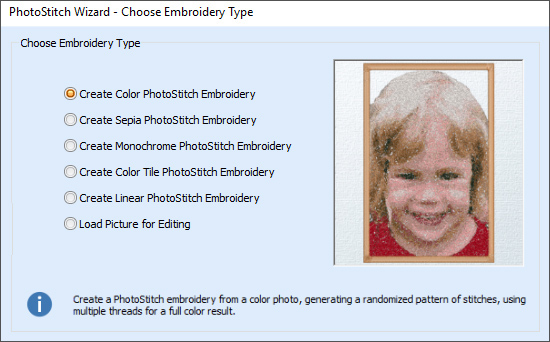
Let's explore some ways to get the most of the PhotoStitch options!
|
Color PhotoStitch Embroidery uses an all-over random stitch that simulates thread painting, and maps color in the image to threads in the thread database.
|
|
|
Sepia PhotoStitch Embroidery maps Sepia tones to black-and-white photos or to color images to make a free-motion style stitch.
|
|
|
Monochrome PhotoStitch Embroidery creates thread-paint style stitches in blacks, grays, whites and some other light neutrals.
|
|
|
Use Color Tile PhotoStitch Embroidery to generate stitches in small blocks or tiled shapes that suggest a hand-worked look like needlepoint. 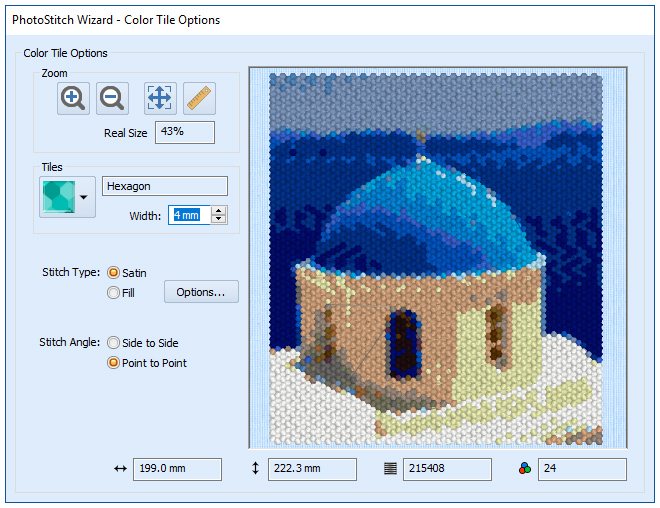
|
|
|
Linear PhotoStitch Embroidery is a novelty stitch, and can use either color or black-and-white images.
If your photo or other image needs some clean-up to produce a nice quality thread painting, in PhotoStitch Don't forget to visit the User and Resource guides for many how-to's, explanations, and step-by-step instructions for creating your PhotoStitch embroideries. Use the in-line Help System as well, for quick reference as you work through the creation process. |
|
Tips and Techniques
Tips and Techniques
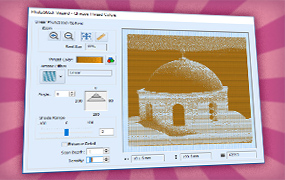
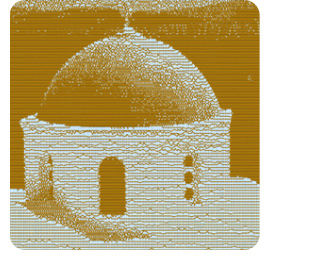
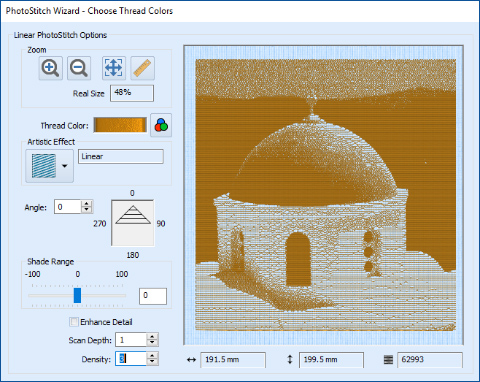
Linear PhotoStitch embroidery has several options that create some fabulous novelty techniques reminiscent of tapestry or vintage tintype photography. In Choose Embroidery Type, select Create Linear PhotoStitch Embroidery.
In the Next window, select Load a Picture
, and browse to Santorini, found in Documents \Premier+ \Samples \Sketch \Pics3 \PhotoLandscapes.
Click Next for the Rotate and Crop Picture window, and adjust the handles on the crop box to isolate the desired portion of the image.
Click Next, and no changes are necessary in Remove Background.
Click Next, and no change is needed in Picture Options.
Click Next, and change the Height to 200mm.
Click Next, and click OK to the pop up that informs you to wait while the stitches generate.
In the Thread Colors window, try a new thread color
in a medium brown or deep tan to evoke a desert feel.
Adjust Scan Depth to 1, to bring the lines of stitches a bit closer together for more detail.
Adjust Density to 3, to increase the distance between stitches and make the design a little more airy.
Select Finish to view and save your new PhotoStitch design!
Don't forget to try some of the other Artistic Effects on many different types of photos and clip art. Sometimes you'll discover serendipity between a specialty effect and the image you use!
Fun Facts to Know and Tell
Did you know that you can select your own personalized MyThreads database when making PhotoStitch, so you know you'll be using threads from your stash for a perfect match?
Best wishes from PREMIER+™
 Watch out next month for the PREMIER+™ 2 newsletter for both Windows and Mac users.