
PREMIER+™ Software Newsletter - May 2017
Welcome to the PREMIER+™ Newsletter. This month we will explore the Encore feature, found in the PREMIER+™ Embroidery module. Let's discover how Encore precisely and quickly repeats designs into circles, shapes and lines, or around the perimeter of a hoop.
Inspired Icons
Inspired Icons
The Encore tab is found in the Ribbon bar in PREMIER+™ Embroidery.
Icons for Type are Circle  ,
Line
,
Line  ,
Shape
,
Shape  and Hoop
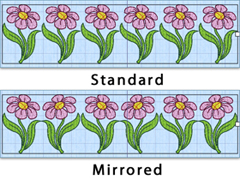
  . Icons for Position are Standard
  ,
which places the repeats oriented in the same direction, and Mirrored
,
which places the repeats oriented in the same direction, and Mirrored  ,
which places repeats facing each other in pairs.
,
which places repeats facing each other in pairs.
Other Icons found in the Encore tab are Preview  ,
used to view the results of the current Encore selection, Cancel
,
used to view the results of the current Encore selection, Cancel  ,
to exit Encore without finalizing the design, and Apply
,
to exit Encore without finalizing the design, and Apply  to create a new Encored design with the selected options.
PREMIER+™ Embroidery is part of the PREMIER+™ EMBROIDERY, PREMIER+™ EXTRA, and PREMIER+™ ULTRA software packages.
Module Mystique
Module Mystique

The designing tools for the Encore tab in the PREMIER+™ Embroidery module are placed across the Menu bar near the top of the work area for fast and easy access. Simply select an Encore Type and Position, set the options for the selected Encore type, and Preview to see if it fulfills your ideas!

When you select an Encore Type such as Circle in the Layout menu, only the functions that can be set for Circle
are active in the rest of the menu bar. Features not available in a specific type of Encore are grayed out,
so you won't accidentally select a feature that can't be used.
The Circle and Line
Types can create the Encore with one or multiple designs.
- Designs will be placed in the Encore in the same order you loaded them into the work area.
- If you select a higher number of Repeats than you have designs, the designs will repeat again in the same layout order.
The designs shown in the illustration are from SuperDesigns, in the Flower and Leaves Category.
 The Shape and
Hoop
Types can only use one or two design elements at a time.
When selecting Position, Standard will orient all the designs in the same direction.
Mirrored will mirror every other element so two designs face each other in pairs along the Encore.
The Shape and
Hoop
Types can only use one or two design elements at a time.
When selecting Position, Standard will orient all the designs in the same direction.
Mirrored will mirror every other element so two designs face each other in pairs along the Encore.
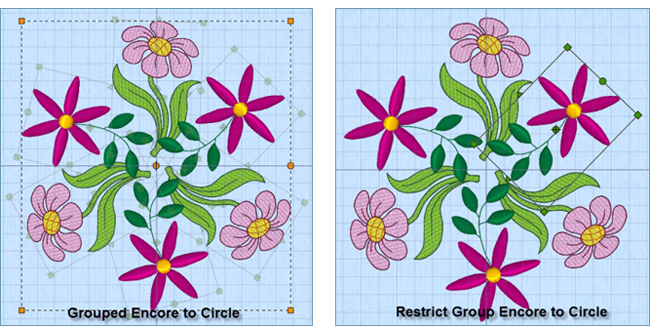
Group is a very useful tool, and available in all four Layout Types. When Group is checked on as you Apply in Encore, the new Encored design will be a fixed group, but all elements are still independent designs within the Group.
- In the Home tab, you can Ungroup to completely remove the grouping for editing. When you
Ungroup
 ,
you will have to select all the designs and click Group
,
you will have to select all the designs and click Group  to make them grouped again.
 - Use Restrict Group
 to keep the original grouping but temporarily unlock the group to enable making adjustments within the existing grouping.
 - When the Group option is selected as you click Apply to finalize the Encore, it's easy to select the Home tab and Restrict Groups. You can make any changes to the individual elements, and then click Restrict Groups again (the icon acts as an on/off toggle) and the individual elements will be selected by the Group box once more.
Arrange Similar helps keep the repeats of each design together, so they stitch one after another to simplify thread changes where possible. For example, an Encore to Circle with two design elements and 6 repeats will have three repeats of each design. When Arrange Similar is selected before Applying, each of the three same elements will ColorSort so they stitch identical thread colors together wherever possible, reducing the number of times you have to change threads. Overlapping of designs may affect how designs ColorSort and stitch order, even when Arrange Similar is selected.
Preview and Cancel  are
great tools for helping audition design choices, or remove some elements and try out others.
are
great tools for helping audition design choices, or remove some elements and try out others.
- Adjust settings multiple times, or change to a different Encore Type, and simply click Preview again to refresh the view.
- To browse for a different design, use Cancel to exit without finalizing the Encore.
Tips and Techniques
Tips and Techniques
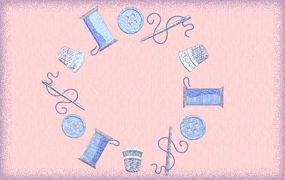
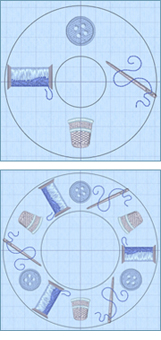
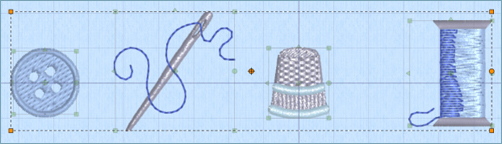
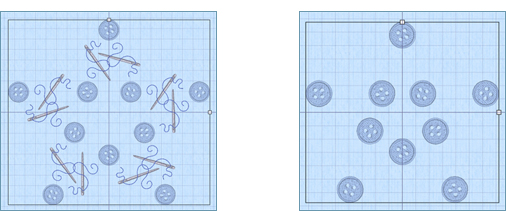
Let's explore the features of the different Encore Types and their options, using the designs of a button, a threaded needle, a thimble, and a spool of thread from the Home Category in the SuperDesigns tab. Create an Encore Circle, Line and Shape, and place designs around the perimeter of the selected Hoop.
Encore to Circle
- Select a 360mm x 200mm Hoop, Orientation Rotated
 .
. - In the SuperDesign tab, create a button, a threaded needle, a thimble, and a spool of thread at their default size and settings
- Use CTRL and A on the keyboard to select all the elements, which will form a temporary group, with a dashed select box, as pictured.
- In the Encore tab, select Encore to Circle , with 4 Repeats, and Group checked.
-
 Click Preview to see how the designs are Encored.
- To change the size of the circle, place the cursor inside the ‘donut'
shaped preview circle to see a cross-hair cursor
 , and then click and drag
toward the center to make the Encore smaller or away from the center to make it larger.
The design placement will adjust automatically.
, and then click and drag
toward the center to make the Encore smaller or away from the center to make it larger.
The design placement will adjust automatically. - To move the entire previewed design to a different location in the hoop,
place the cursor in the center of the ‘donut' shaped preview to see a four arrow cursor
 , and then click and drag to move the entire design to a new location.
- To change the size of the circle, place the cursor inside the ‘donut'
shaped preview circle to see a cross-hair cursor
-
Change Repeats to 6 and click Preview
to see how the designs begin repeating once there are more Repeats than the number of design elements.
- Change Repeats to 12 and click Preview .
- 12 Repeats divided by 4 designs creates three complete groups of repeats.
- Drag the circle to adjust the size and spacing of the encored elements.
- Make sure all the stitches sit inside the work area (indicated by the Grid, if visible) or you won't be able to Export the final design.
- The select lines can be outside the work area as long as no stitches extend outside.
- Click Apply to finalize the design.
- Remember to use Save As
 and Export
  if you want to stitch your new design!
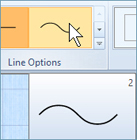
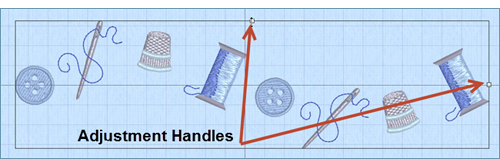
Encore to Line
- Click Undo
 so the four designs are restored.
- On the keyboard, use CTRL and A to Select All.
-
 Select Encore to Line
- Select Line Option #2, a wave.
- Set 8 Repeats, and click Preview
- Adjust the Encored line by dragging the white handles at top and right end (as you face it).
- Click Apply to finalize the Encore.
- Save As and Export as desired.
TIP: Use Cancel to end the Encore function without finalizing, if you want to change the Layout Order of the designs so they are in a different repeat order, or add or remove elements for your custom designs!
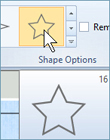
Encore to Shape
- Click Undo so the four designs are restored.
- In the Encore tab, select Encore to Shape .
 Click Preview to see only the two designs that stitch first are used.
- The first design forms the corners (points) of a shape, and the second design fills between the corners.
- If the designs are too large to form a repeat, they will not appear unless you drag the select box handles to make the design larger.
- Select Shape 16, a star.
- Uncheck Remove Corners.
- Set Gap (space between the repeats) to 1mm.
- Place a check by Group.
- Click Preview
- Adjust Height with the top select handle, and Width with the right select handle.
- Hold the CTRL and SHIFT keyboard keys as you drag to keep the design proportional from the center.
- If you make the select box so small the second design can’t form a single element, you will only see the first design element at the corners.
- Adjust the size as desired.
- Click Apply .
- Save As and Export as desired.
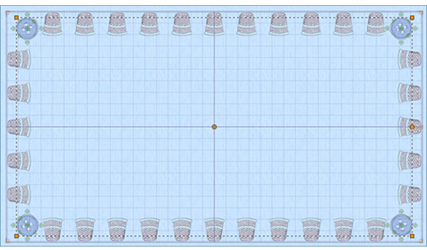
Encore to Hoop
- Click Undo so the four designs are restored.
- Click to select the Button design
- Hold the CTRL key and click to select the Thimble.
- Only those two designs are selected.
- Select Encore to Hoop .
- Uncheck Remove Corners.
- Change Margin (empty space at edge of hoop) to 1mm.
- Change Gap (space between repeats) to 10mm.
- Place a check by Group.
- Click Preview .
- Notice the unused elements remain in the work area.
- Click Apply .
- Use the Tab keyboard key to scroll to and select the Needle and Thread design.
- Delete with the keyboard DEL key.
- Tab to the Thread Spool and delete it as well.
- Tab to select the Encored border you made with Encore to Hoop .
- Select the Home tab.
- Click Restrict Groups in the Group menu.
- Hold the CTRL key and click on each of the four corner designs, so only they are selected.
- The Group box will appear to be around all the designs, but you’ll see the shadowed boxes inside that show which elements are in the temporary Group!
- Hold the CTRL and SHIFT keys to keep the Group select box proportional, and drag inward to reposition the corner elements to change their look!
- Click Restrict Groups again to bring back the original Grouping.
TIP: Groups make Encore more flexible and give you more opportunities to play with individual elements within the Encore!
- Save As and Export as desired.
Other Tips:
- Once you have clicked Apply, use Life View
 to preview your designs.
- Use Undo if you have Applied but change your mind.
- You can Save
 or Save As and then Export , and still Undo to make a different combination.
- If working with Grouped elements, Save / Save As will retain the individuality of the elements within the group so you can open them and make additional changes.
Fun Facts to Know and Tell
Did you know the Endless Wizard in PREMIER+™ Embroidery will automatically add alignment markers to your Encored designs, making them easy to use as borders on larger projects?
Best wishes from PREMIER+™
PS: Watch for the PREMIER+™ newsletter next month as we look at how to use the Endless Embroidery tool to make repeating designs with registration marks, suitable for stitching embroideries as endless borders with multiple hoopings!