
PREMIER+™ Software Newsletter - June 2017
Welcome to the PREMIER+™ Newsletter. This month we will look at how easily you can create Endless embroidery designs using PREMIER+™ Embroidery. See how quickly you can stitch nicely aligned borders or pattern repeats, symmetrically placed across your project.
Inspired Icons
Inspired Icons
The Endless icon  appears in the Wizards tab (as shown in the illustration) in the Ribbon bar of the PREMIER+™
Embroidery module. The Endless Embroidery function adds alignment markers to help precisely align your repeated hoopings so they fit against each other correctly.
appears in the Wizards tab (as shown in the illustration) in the Ribbon bar of the PREMIER+™
Embroidery module. The Endless Embroidery function adds alignment markers to help precisely align your repeated hoopings so they fit against each other correctly.
You can also select the Gap or spacing between repeated hoopings, and whether to repeat the original design as many times as possible within a single hooping.
The PREMIER+™ Embroidery module is in the PREMIER+™ EMBROIDERY, PREMIER+™ EXTRA, and PREMIER+™ ULTRA software packages.
Another icon that's useful when working with Endless Hoop settings is the Hoop icon  .
Many machine brands have specialty hoops that allow you to quickly move the fabric and close the hoop to facilitate stitching borders or bands of design repeats within your project.
.
Many machine brands have specialty hoops that allow you to quickly move the fabric and close the hoop to facilitate stitching borders or bands of design repeats within your project.
Module Mystique
Module Mystique
The Endless Wizard , found in the Wizards tab in PREMIER+™ Embroidery guides you through adding alignment
marker stitches and setting spacing between the repeat hoopings of the Endless designs.
Before opening the Endless Wizard,
use the Hoop icon in the Quick Access toolbar to select a hoop for your embroidery machine.
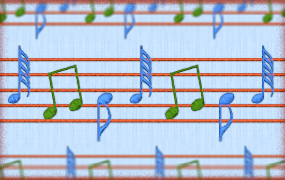
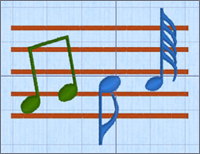
The designs in the illustration are SuperDesign elements from Music 3, Design 1 - Staff, elongated horizontally to make a longer staff; Music 4, Design 3 – 128th Note,
and Design 4- Eighth note; and Music 6, Design 7 – Eighth Notes. Size was adjusted with the green select box handles as preferred.
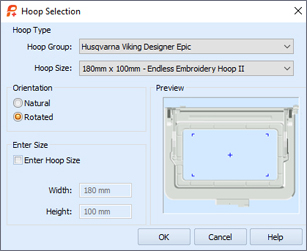 Select the Hoop icon from the Quick Access toolbar at the top of the work area to open the Hoop Selection dialog.
Hoop Type contains options for selecting hoops by brand and size.
Select the Hoop icon from the Quick Access toolbar at the top of the work area to open the Hoop Selection dialog.
Hoop Type contains options for selecting hoops by brand and size.
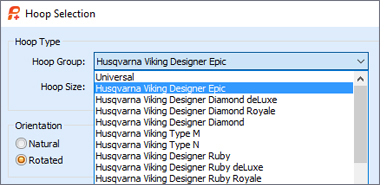 Use the Hoop Group scrolling menu to select from many brands and models of embroidery machines.
- The Universal selection offers a series of commonly used hoop sizes.
- All Hoops lists every available hoop within the Hoop Group menu.
- Many machine brands have hoops created especially for easy and fast rehooping of designs along the edge of fabrics, commonly called Endless Hooping.
Orientation lets you design in the hoop in a Natural orientation
(vertical for most hoops, as they clip on the embroidery arm) or Rotated (rotated 90 degrees counterclockwise on most machines).
If a special hoop for your specific brand isn't shown, select Enter Size. Type in the Width and Height in inches or millimeters to create a 'generic' hoop with a stitchable area of your machine's hoop. (The PREMIER+™ Embroidery software is so smart, it can automatically do the math, whichever number system you use!) You can adapt any hoop you own for stitching Endless Embroideries!
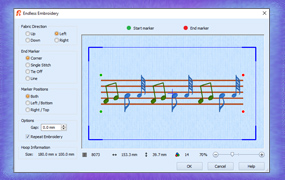
Once you select the Endless icon , the dialog box offers several options for setting up embroidery designs so they can be hooped quickly to create a border or repeated pattern across your project.
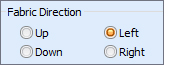 Fabric Direction is set by how you plan to move the fabric through the hoop for subsequent hoopings.
- Options include Up or Down for a vertical hoop, and Left or Right for a horizontal hoop.
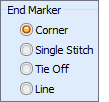 End Markers stitch to show you where to locate as the machine moves the needle over the exact point for the start of the subsequent embroidery.
- Marker Options are Corner (stitches in L shape to form a corner shape), Single Stitch, Tie Off, and Line.
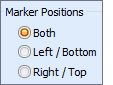 Marker Positions determine how many markers are used, and their location.
Tip: Use Both for maximum alignment points.
Marker Positions determine how many markers are used, and their location.
Tip: Use Both for maximum alignment points.
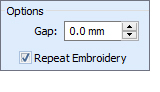 Gap sets the distance between repeats, and at the starting and ending of the Endless Designs.
- Gap can be increased or decreased (use negative numbers to overlap designs).
- Alignment markers are placed in the middle of the Gap area at the starting side of the design and the ending side of the design, so a Gap of 4 would add 2mm to the Top/Bottom or Right/Left side of the first design and then add a Marker. The same amount is added at the opposite side of the design, so total Gap will be 4mm.
Repeat Embroidery is useful when you have a single element you want to repeat as many times as possible before rehooping.
The Hoop Information box shows the size selected Hoop.
The Preview window gives a visual of how the finished Endless Design will appear, info about the design size, number of thread changes, and stitch count, and the Zoom slider helps see the overlap and repeat areas in closer view.
Tips and Techniques
Tips and Techniques
Let's create an Endless Embroidery, so you get a better idea of how the process works!Select a hoop, and arrange some embroideries,
then use The Endless Wizard to place marker stitches for aligning your designs, and set the gap between the sections of your endless design.
- Select the Hoop icon and then your preferred Hoop Group and
Hoop Size for at least a 180 mm x 100mm hoop. Set Orientation to Rotated to make a horizontal hoop.
- You can make any hoop size Endless, but using the size above will let you better view how the settings change how the design is formed.
- If your machine brand doesn't have a specific hoop designed for endless embroidery, select the hoop you plan to use, or use Custom Hoop to make a hoop size that isn't in the list.
 Arrange a selection of embroidery designs within the hoop.
Tip: The Endless process will automatically incorporate all the designs in their current arrangement,
so there is no need to select or combine. ColorSort and Remove Overlap are incorporated at the end when you Export the finished design.
Arrange a selection of embroidery designs within the hoop.
Tip: The Endless process will automatically incorporate all the designs in their current arrangement,
so there is no need to select or combine. ColorSort and Remove Overlap are incorporated at the end when you Export the finished design.- Select the Wizards tab and then the Endless icon .
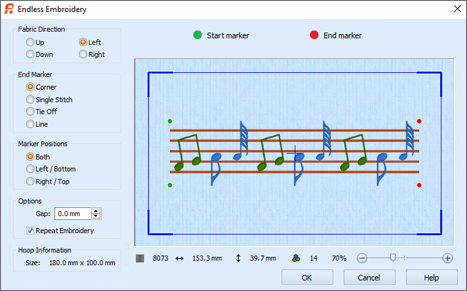
- In the Endless Embroidery dialog box, Fabric Direction is set at Left.
- The Green markers indicating the beginning alignment points are at the left side of the embroidery, and the Red markers for the end alignment points are on the right, assuming that as you rehoop, you'll move the embroidered fabric to the left, so the next set of green beginning alignment points will be against the end of the previously stitched design.
- Select Up to see how the designs stack vertically. This assumes that you will move the stitched fabric sections up in the hoop.
- Try out Down and Right to see how the design repeats and marker stitches change.
- Reselect either Left or Right, according to how you plan to hoop your repeat embroideries.
- The End Marker setting defaults to Corner, which creates an L shape of stitches. It's secure but still easy to remove.
- For a very loose marker stitch, try Single Stitch.
- For a very secure marker, use Tie Stitch.
- Many people like Line, which creates a line of basting stitches to help ensure the designs are correctly aligned.
- Marker Positions determines whether there are one or two markers at each end of the Endless Design.
- Select each and use the one most appealing to you.
- The Both setting places two markers at each end to give the maximum alignment opportunity.
- Since Gap determines how far apart the designs are from one hooping to the next, you can choose whether you want repeats to touch or be spaced apart.
- Since this is a line of musical notes, set Gap to 0 so you can seamlessly place the end of one repeat right against the next!
- Select Repeat Embroidery to create as many multiple elements as will fit within this hooping.
- Depending on the hoop size you selected you may get two, three or more repeats within the hoop, since we chose 0 for the Gap.
- Check out the final design size and stitch count under the Preview Window!
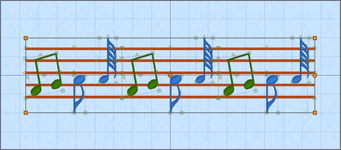
- Select OK to create your Endless Embroidery!
Tip: Notice the design is created as a Group, but all the elements are still 'open' or unmerged, with individual
select boxes.
You can still make adjustments by using the Group tools in the Design tab.
- Select Save
 or Save As
  to make a working design file which retains the unmerged working properties of the original design elements.
- Use Export
 to finalize or 'flatten' the embroidery and optimize for your personal embroidery machine. In Export,
you can select from several options, including ColorSort and Remove Overlap.
to finalize or 'flatten' the embroidery and optimize for your personal embroidery machine. In Export,
you can select from several options, including ColorSort and Remove Overlap.
-
View in real life before stitching by opening your creation in Life View
 .
.

Fun Facts to Know and Tell
Did you know that PREMIER+™ Embroidery software has virtually unlimited hoop sizes? Use Enter Size and type in the height and width of your hoop's stitch field to make your own custom hoop size!
Best wishes from PREMIER+™
PS: Watch for the PREMIER+™ newsletter next month as we look at how to use the Control Strip's tools in the PREMIER+™ Modify module.