
PREMIER+™ Software Newsletter - July 2017
This month we will look at the Control Strip and working with Layers in the PREMIER+™ Modify module, part of the PREMIER+™ ULTRA software package, or available as an add-on upgrade to PREMIER+™ Embroidery or Embroidery Extra in the PREMIER+™ EMBROIDERY Software Purchase Center, at http://www.embroiderypurchasecenter.com/.
PREMIER+™ 2 AnnouncementWe are proud to announce the upcoming release of the PREMIER+™ 2 Embroidery System software. This will be exciting for you as a user of embroidery software. There are many new features that you've been asking for such as: Bezier Curve, Word Sculpt and much more!
View a video of some of the new features.
The PREMIER+™ 2 Embroidery System software will be released in October 2017. Look out for the Embroidery Software Newsletters over the next few months, as we give you more information about the features of the PREMIER+™ 2 Embroidery System software and how to secure your copy.
Inspired Icons
Inspired Icons
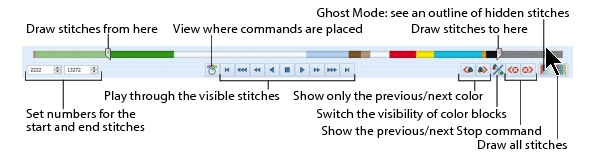
The Control Strip in PREMIER+™ Modify has several icons that help you view or hide selected areas within complex embroidery designs as you work with the active design Layer. View the stitches by color, between Stop commands, or by number. Use Ghost Mode to view a pale version of the inactive stitches and designs.
Tip: When several embroideries are loaded using the Insert  function,
only the currently active embroidery design Layer will be available to filter using the Control Strip.
function,
only the currently active embroidery design Layer will be available to filter using the Control Strip.
Control Strip Player  icons include:
-
Pause for Commands
 , to make the player pause briefly at Stop, Color Change, or Trim Commands when playing visible stitches of the active design.
-
Start
 , to jump to the start of the visible stitches in the active design.
-
Fast Rewind
 , to quickly move backward, or hide stitches from the visible end of the design.
-
Medium Rewind
 , to move backwards at medium speed.
-
Rewind
 , to move backwards at standard speed.
-
Stop
 , to stop on the last currently visible stitch.
-
Play
 , to show stitches as you move forward, or toward the end of the stitches, at standard speed.
-
Medium Play
 , to move forward at medium speed.
-
Fast Play
 , to move forward at fast speed.
-
Jump to End
 , to quickly show all stitches between the first visible and the end of stitches, in the active design.
Other commands in the Control Strip bar include:
-
Draw Previous Color Block
 or Draw Next Color Block
  to move toward the beginning or end of the design, one thread color at a time.
-
Invert Visible Color Blocks
 , to toggle the visible colors so they are hidden, and hidden colors show. This toggle reverses the visible colors each time it is selected.
-
Draw Previous Stop
 or Draw Next Stop
 , to move through Stop commands in the embroidery, commonly used to mark halts for appliqué in some brands of embroidery machines.
Tip: Some sewing and embroidery machines do not recognize and will ignore Stop commands.
, to move through Stop commands in the embroidery, commonly used to mark halts for appliqué in some brands of embroidery machines.
Tip: Some sewing and embroidery machines do not recognize and will ignore Stop commands.
-
Ghost Mode
 , to make hidden stitches in the active design visible in a faded or ghosted view, so you can use them as a reference when editing stitches.
-
Draw All Stitches
 , to quickly redraw all stitches in the currently active design.
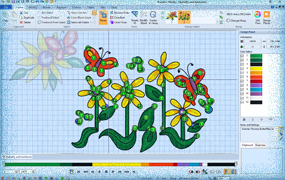
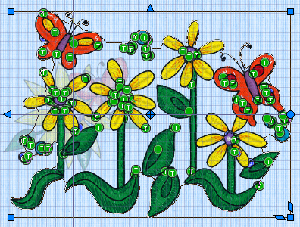
The designs pictured in the illustration above are Flower Garden and Butterfly and Sunflower from Documents\ Premier+\ Samples\ Premier+Emb\ Stitch2\ Butterflies and Bugs.
Module Mystique
Module Mystique
The PREMIER+™ Modify module is designed for more sophisticated editing of finalized embroidery designs in most commonly available formats. The Modify module has a number of useful features that help you select, edit, and change all or part of one or many existing designs.
PREMIER+™ Modify is designed with a Quick Access Toolbar at the very top, with a Ribbon Bar underneath containing multiple tabs.
Each tab has a grouping of tools designed for a specific purpose, such as working with Files, changing settings for the work area View, or accessing the built in Help system.

The Home tab has commonly used tools, including a Design Select field where you can choose which design is active when multiple designs have been inserted in Layers.
The Control Strip is visible from every tab in the Ribbon Bar at the bottom of the page, just above the QuickLink Toolbar and Zoom Toolbar.

The Help system in Modify has a lot of good information on the features of the Control Strip and its individual functions, plus some tutorials to help you learn to manipulate the tools.
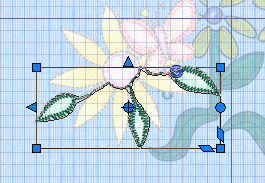
The Draw Stitches bar has a Start slider, an End slider, and bands of color that represent each thread color change in the active design.
- When you drag the Start slider, stitches hide from the beginning of the design to the location of the slider.
- Drag the End slider to isolate stitches from the end of the design to the slider. Use these two sliders to help isolate stitches that might otherwise be difficult to select, such as underlay or traveling stitches that sit under fill or satin stitches in your embroidery.
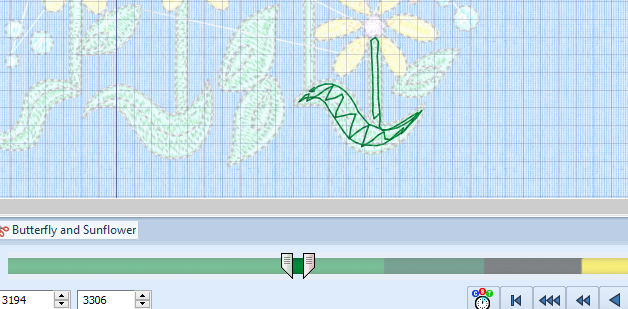
 Adjust the numbers of start and end stitches to fine tune the visible stitch selection by clicking the arrows to show or hide one stitch at a time,
when you need to isolate a specific stitch for functions such as inserting a Color Change
Adjust the numbers of start and end stitches to fine tune the visible stitch selection by clicking the arrows to show or hide one stitch at a time,
when you need to isolate a specific stitch for functions such as inserting a Color Change  or Stop command
  .
.
The Player toolbar lets you ‘play’ through live stitches in the work area exactly as they exist in the work in progress,
so you can better visualize how the stitches are layered, and the direction in which they stitch. The Control Strip
Player is different from the Design Player  in PREMIER+™ Modify, which shows how the design will stitch after it has been Exported,
using your current Export settings in PREMIER+™ Configure, to finalize for your embroidery machine.
in PREMIER+™ Modify, which shows how the design will stitch after it has been Exported,
using your current Export settings in PREMIER+™ Configure, to finalize for your embroidery machine.
You can quickly filter sections of the active embroidery  by color, by inverting the currently visible stitches for the hidden ones, by Stop commands, and more.
The tools in the Control Strip are a tremendous help in isolating sections of embroidery designs so you can make those design changes fast and easy!
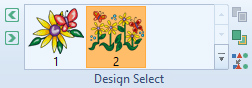 Another function found in the Design tab of PREMIER+™ Modify is called Design Select.
When designs are Inserted
in PREMIER+™ Modify, they stay separated in discrete layers so you can easily make changes to the individual designs but still view how the finished product will look when Exported for stitching.
Another function found in the Design tab of PREMIER+™ Modify is called Design Select.
When designs are Inserted
in PREMIER+™ Modify, they stay separated in discrete layers so you can easily make changes to the individual designs but still view how the finished product will look when Exported for stitching.
- Click the embroidery layer you want to edit in the Design Select window so it is highlighted and it will become the active design in the work area. Inactive designs are visible but faded in the work area to indicate their stitches are not editable.
- Use the Previous Design
 and Next Design
  icons to step through multiple embroideries, or change the stitch order with Move Backwards (toward the beginning of the design) and Move Forwards (toward the end of the design).
- Combine with Previous
 will merge the currently selected design with the one that stitches just before it. Remember, however, combining or merging in the Modify module will not automatically remove overlapping layers.
Tip: To remove overlap before you stitch, keep each design in its discrete Layer until you are done editing, the use
Export  to finalize the design for stitching, as you can opt to remove overlap when exporting. To preview how the design will export as your work is in progress, click
Life View
to finalize the design for stitching, as you can opt to remove overlap when exporting. To preview how the design will export as your work is in progress, click
Life View  . Life View shows a live preview of your entire work area, filtered to show how the design will appear after Export. Or select the Design
Player to play through stitches as they appear after Export.
. Life View shows a live preview of your entire work area, filtered to show how the design will appear after Export. Or select the Design
Player to play through stitches as they appear after Export.
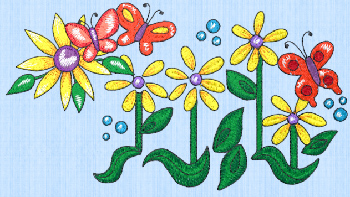
The designs pictured in the illustration above are Flower Garden and Butterfly and Sunflower from Documents\ Premier+\ Samples\ Premier+Emb\ Stitch2\ Butterflies and Bugs.
Tips and Techniques
Tips and Techniques

Let's step through how to use some of the Control Strip and Design Select functions so you can better utilize them when editing your collections of embroidery designs!
-
Select Insert from the Quick Access toolbar, and browse to Documents\ Premier+\ Samples\ Premier+Emb\ Stitch2\ Butterflies and Bugs.
- Select Butterfly and Sunflower, hold down the keyboard CTRL key and select Flower Garden, so both are selected, and then click Open.
-
In the Design tab, Design Select box, if Flower Garden is the second design, select it and click Move Backwards
 so it will stitch first, and the Butterflies and Bugs design will stitch second so it’s layered over the top.
-
 With the Flower Garden design selected as the active design, click Select All Visible
  to box select the active design.
-
Select Resize
 in the Home tab, and adjust by holding CTRL and Shift on the keyboard while you drag a corner handle to enlarge the design as desired, so it’s more in scale with the Butterfly and Sunflower design.
- Click and drag the selected design to position it as desired.
-
Use Next Design in Design Select to move to the Butterfly and Sunflower, select with one of the Selecting tools if necessary, and adjust its position so it just overlaps the other design a bit, giving it more perspective.
-
 If Ghost Mode is not selected, click to activate Ghost Mode so hidden stitches in the active design will be faintly visible for reference.
-
Use Draw Next Color Block to isolate the first thread color in the active design, Butterfly and Sunflower. Click Draw Next Color Block again to see the stitches used to add shading to the leaf.
 Click Select All Visible to reselect just the highlighting stitches, and then
Delete
Click Select All Visible to reselect just the highlighting stitches, and then
Delete  to remove the stitches.
-
Click Invert Visible Color Blocks to make the hidden stitches in the active design the visible selection.
-
 Click Draw All Stitches to ensure all the stitches are showing in the active design.
-
Use Life View to preview how the embroidery will appear upon Export.
-
Use Design Player to play through the stitches as though they have been exported.
Fun Facts to Know and Tell
Did you know that PREMIER+™ Modify module’s Object tab lets you convert stitch types and automatically adjust density for selected stitch objects?
Best wishes from PREMIER+™
PS: Watch for the Premier+™ newsletter next month when we will design our own unique system Font using QuickFont.