
PREMIER+™ Software Newsletter - January 2017
Welcome to the PREMIER+™ Embroidery Software January 2017 Newsletter. This month we will delve into the features and functions of PREMIER+™ Thread Cache  , and how to work with My Thread Databases.
Inspired Icons
Inspired Icons
The PREMIER+™ Thread Cache module  lets you personalize the PREMIER+™ My Thread Databases you
use when changing thread colors in your embroideries. PREMIER+™ Thread Cache appears in the PREMIER+™ ULTRA,
PREMIER+™ EXTRA and PREMIER+™ EMBROIDERY software packages.
lets you personalize the PREMIER+™ My Thread Databases you
use when changing thread colors in your embroideries. PREMIER+™ Thread Cache appears in the PREMIER+™ ULTRA,
PREMIER+™ EXTRA and PREMIER+™ EMBROIDERY software packages.
Thread Cache has three tabs with settings to customize how your threads are displayed.
My Thread Ranges  lets you select a short list of threads you use often, and set the order they appear in the list.
My Thread Databases
lets you select a short list of threads you use often, and set the order they appear in the list.
My Thread Databases  lets you create custom thread lists with your own titles and change their order for your special
projects or add them to your personal thread stash. My Thread Stock
lets you create custom thread lists with your own titles and change their order for your special
projects or add them to your personal thread stash. My Thread Stock  holds an inventory of your personalized
My Thread Databases that can be printed, or uploaded to the Cloud and viewed on your mobile device by browsing to http://threadcache.premierplusembroidery.com/
holds an inventory of your personalized
My Thread Databases that can be printed, or uploaded to the Cloud and viewed on your mobile device by browsing to http://threadcache.premierplusembroidery.com/
 For an overview of features, check out Chapter 5 in the PREMIER+™ Embroidery User's guide.
For more detailed information on setting up and using PREMIER+™ Thread Cache, refer to the PREMIER+™ Thread Cache Reference Guide.
For an overview of features, check out Chapter 5 in the PREMIER+™ Embroidery User's guide.
For more detailed information on setting up and using PREMIER+™ Thread Cache, refer to the PREMIER+™ Thread Cache Reference Guide.
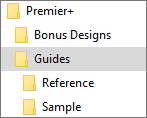
Printed documentation is included in new (not upgrade) boxed versions of PREMIER+™ ULTRA, PREMIER+™ EXTRA, and PREMIER+™ EMBROIDERY. You can also find all User and Reference Guides as PDF files in the Documents\Premier+\Guides folder.
Module Mystique
Module Mystique
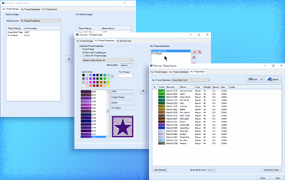
This month, let's take a closer look at the components of the PREMIER+™ Thread Cache module , and what you can do from each menu tab.
The My Thread Ranges menu is used to customize the short list of thread ranges that appear by default when you select
different threads within the PREMIER+™ Embroidery System modules.
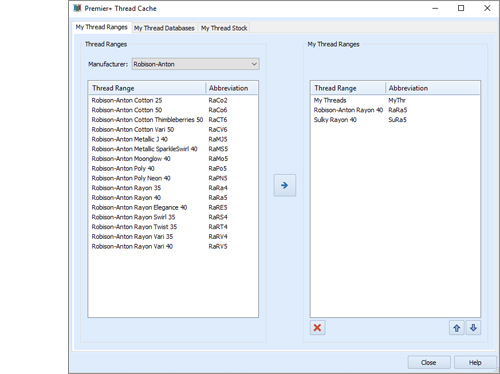 The left half of the My Thread Ranges menu contains all the Thread Ranges, itemized by Manufacturer, in a drop-down list.
- To add a new thread to your My Thread Ranges ‘quick list', simply select a Manufacturer from the list on the left, and then select a specific Thread Range from that manufacturer.
- Use the Add to My Thread Ranges icon
 to transfer the selected Thread Range to your My Thread Ranges list.
 - To adjust the position of a thread range in the My Thread Ranges list, click a Thread Range to select it, and click Move Up
 or
Move Down
or
Move Down  .
. - To remove a Thread Range, select and then click Remove from My Thread Ranges
 .
.
In the My Thread Databases menu , create multiple custom My Thread Ranges that can contain just threads you own, or specific threads you need for a project.
 The left half of the menu lists all Thread Ranges in the Standard Thread Database, including those you have added. Select from Show My Thread Ranges, or Show All Thread Ranges when browsing the existing Thread Databases.
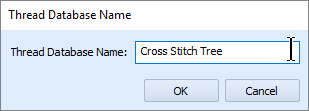 To add a special My Thread Database, click Add a New Database
  and type the desired name in the Thread Database Name field, then click OK
Other Database management tools include Delete a Database  ,
Rename a Database
,
Rename a Database  , and Import Threads from an Embroidery
  .
.
- Once a custom My Thread Database is selected, click a thread from the Standard Thread Database on the left and then click Add to My Threads
.
If you know a thread's number, you can also type that number into the Find Thread field, but be sure to click to select the found thread before adding.

- Once you have multiple threads in a My Thread Database, select a thread in the list and use Move Up or Move Down to adjust the location of individual selected thread.
Other functions for managing specific My Thread Databases include Add New Thread  to add newly marketed threads not yet in the existing PREMIER+™ thread database, Delete Thread
  , Edit Thread
  , and Copy Thread
  .
.
 Use the My Thread Stock menu after you have set up custom My Thread Databases, to keep an inventory of how many spools you have on hand.
- Simply select the custom thread database you want to inventory from the drop-down menu, so the threads in that database are visible.
- Double-click a field in the Spools column to add the number of spools in stock, or to edit the number already in the field.
- Use Print
 to make a paper list to carry with you.
- Use Upload to the Cloud
 to create online access to your My Thread data. Enter the e-mail address and password for your
established Software Registration Database or Social Media account to administrate your Cloud database data.
Access from mobile devices by browsing to http://threadcache.premierplusembroidery.com/.
to create online access to your My Thread data. Enter the e-mail address and password for your
established Software Registration Database or Social Media account to administrate your Cloud database data.
Access from mobile devices by browsing to http://threadcache.premierplusembroidery.com/.
Tips and Techniques
Tips and Techniques
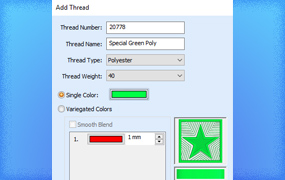
Adding a New Thread in the My Thread Database is easy. Let's explore how it's done in PREMIER+™ Thread Cache!
- Add New Thread opens the Add Thread dialog box.
- Type in a Thread Number (usually from the manufacturer's information on the spool).
- Give it a Thread Name.
- Select a Thread Type and Thread Weight from the drop-down menus.
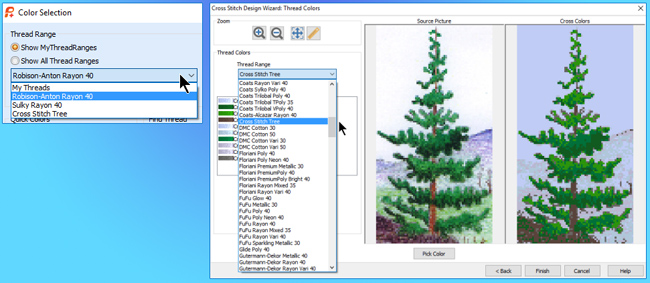
- If you have the manufacturer's RGB color reference list, simply type in the Red, Green and Blue numbers in Quick RGB. Or,
click Single color
 , and select the thread's color from the color chart.
- Click OK, and your new thread will appear at the bottom of the selected thread database list.
Fun Facts to Know and Tell
Did you know that you can save stitch type preferences as Favorites in the PREMIER+™ Create stitch type Options settings boxes, and also reset stitch type preferences to their default?
Best wishes for the New Year from PREMIER+™
PS: Watch for the PREMIER+™ newsletter next month as we look at what a SuperDesign is, how to make a SuperDesign, and how to edit SuperDesign properties!