
PREMIER+™ Software Newsletter - April 2017
Welcome to the PREMIER+™ Newsletter. This month we will discuss how to create custom quilt blocks for your embroidery machine with the QuiltBlock Wizard in PREMIER+™ Embroidery Extra, part of the PREMIER+™ EXTRA or PREMIER+™ ULTRA Software Packages.
Inspired Icons
Inspired Icons
The PREMIER+™ QuiltBlock Wizard  is found on the Wizards tab
  in the Ribbon Bar.
The QuiltBlock Wizard creates quilt blocks for your embroidery machine, either sized to a
specific branded embroidery hoop, or custom-sized to fit a specific block.
in the Ribbon Bar.
The QuiltBlock Wizard creates quilt blocks for your embroidery machine, either sized to a
specific branded embroidery hoop, or custom-sized to fit a specific block.
Simply step through the Wizard as you select a block style, and edit block Options, to create just the perfect block to finish your quilted projects in your embroidery machine’s hoop!
Module Mystique
Module Mystique
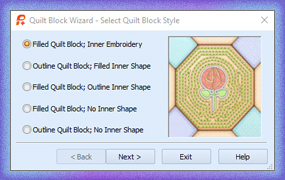
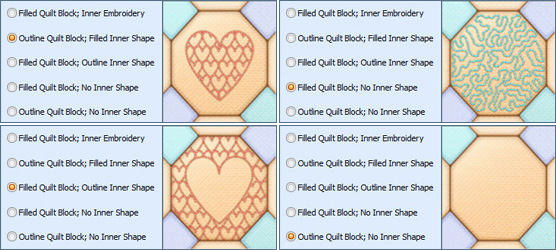
The QuiltBlock Wizard has five block styles in the Select Quilt Block style page. Each block has differing options,
depending on the block’s design. As you select a block style from the list, the block Preview updates so you can visualize how the style is designed.
 Once you select a block style, the steps to create each block are individualized to the block style, as well.
Simply select a block style in the Wizard, and then click Next  to go to the next step for that particular
style’s settings and Options. At any point in the Wizard, you can also select Back
to go to the next step for that particular
style’s settings and Options. At any point in the Wizard, you can also select Back  to change previous selections.
Tips and Techniques
Tips and Techniques

Let’s step through designing a Filled Quilt Block; Inner Embroidery  setting
the angle of the block and using one of multiple types of fill, and placing an embroidery in the center of the design.
setting
the angle of the block and using one of multiple types of fill, and placing an embroidery in the center of the design.
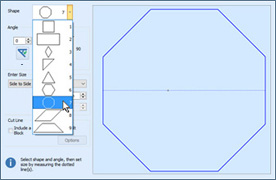 Click Next to go to the Select Size page,
where the Wizard will offer you nine different blocks in the drop-down Shape menu. The shape pictured here is shape 7.
Click Next to go to the Select Size page,
where the Wizard will offer you nine different blocks in the drop-down Shape menu. The shape pictured here is shape 7.
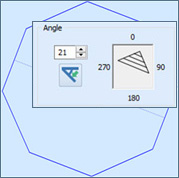 Angle settings will change the rotation or angle of the selected block, so you could, for example, set a block on point.
Enter Size options change with the different shapes. Depending on your selection, you can type in a dimension for the A side and/or the B side.
Angle settings will change the rotation or angle of the selected block, so you could, for example, set a block on point.
Enter Size options change with the different shapes. Depending on your selection, you can type in a dimension for the A side and/or the B side.
Some block shapes use only the A measurement, and others use both A and B. If the B option is not available, the function will be greyed out.
The A and / or B Size settings may be typed in as mm or inches (“), and will automatically convert to your preferences, as set in PREMIER+™
Configure  , in the Appearance tab.
Select "Include a cut line around my Quilt Block" to add a seam allowance if you plan to finish the block by seaming to other blocks,
commonly used in Quilt-As-You-Go techniques. You need to reduce the size of the block by the amount of the seam allowances in Enter Size to make it fit into the hoop.
, in the Appearance tab.
Select "Include a cut line around my Quilt Block" to add a seam allowance if you plan to finish the block by seaming to other blocks,
commonly used in Quilt-As-You-Go techniques. You need to reduce the size of the block by the amount of the seam allowances in Enter Size to make it fit into the hoop.
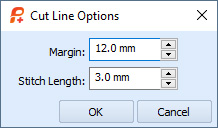 When checked, Cut Line Options include Margin (seam allowance) and Stitch Type. Type in the options in mm, inches (“) or fractions as desired,
and they will automatically recalculate to your settings from PREMIER+™ Configure.
When checked, Cut Line Options include Margin (seam allowance) and Stitch Type. Type in the options in mm, inches (“) or fractions as desired,
and they will automatically recalculate to your settings from PREMIER+™ Configure.
Uncheck "Include a cut line around my Quilt Block" if you plan to stitch your quilting design by hooping a pieced quilt top layered with batting and backing as a ‘sandwich’, so seams around individual blocks aren’t needed.
 Select Next to go to the Load Embroidery page, which is unique to the Filled Quilt Block;
Inner Embroidery style. Here, you select the embroidery you want to use in this block style.
Use Open Embroidery
Select Next to go to the Load Embroidery page, which is unique to the Filled Quilt Block;
Inner Embroidery style. Here, you select the embroidery you want to use in this block style.
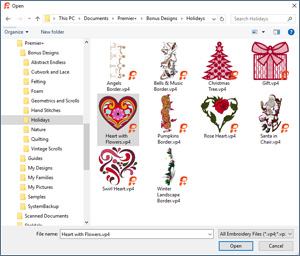
Use Open Embroidery  to browse to the files and folders on your computer,
shown here with Hearts with Flowers from the Documents\Premier+\Bonus Designs\Holidays folder from PREMIER+™ ULTRA.
to browse to the files and folders on your computer,
shown here with Hearts with Flowers from the Documents\Premier+\Bonus Designs\Holidays folder from PREMIER+™ ULTRA.
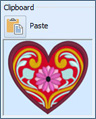 Alternatively, if you Copy
  or Cut
  an embroidery to the clipboard before opening the QuiltBlock Wizard,
it will appear on the Clipboard viewer. Simply click Paste
an embroidery to the clipboard before opening the QuiltBlock Wizard,
it will appear on the Clipboard viewer. Simply click Paste  to bring the design into the Wizard.
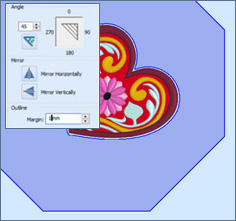 Click Next to go to the Adjust Embroidery page. Settings here include changing design Angle,
Mirror Horizontally or Mirror Vertically, and Outline Margin (the distance between the quilting stitches and the embroidery’s edges).
Click Next to go to the Adjust Embroidery page. Settings here include changing design Angle,
Mirror Horizontally or Mirror Vertically, and Outline Margin (the distance between the quilting stitches and the embroidery’s edges).
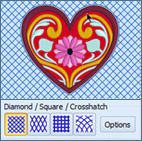 Select Next to go to the Select Fill Pattern page. Here, you can select from multiple types of fills,
each with their own specific Option settings to adjust and vary the quilting around the embroidery.
Select Next to go to the Select Fill Pattern page. Here, you can select from multiple types of fills,
each with their own specific Option settings to adjust and vary the quilting around the embroidery.
 Try out the different stitch types, and then click the Options icon to see how you can adjust the different types of fills.
Click Finish to create the quilt block embroidery! Be sure to Save
Try out the different stitch types, and then click the Options icon to see how you can adjust the different types of fills.
Click Finish to create the quilt block embroidery! Be sure to Save  the embroidery into a .vp4 file, and then Export
  to finalize your embroidery for your specific brand of machine.
Take a little time today to play with each of the quilt block styles, and then stitch up a sampler table runner or wall hanging to liven up your home or workspace!
to finalize your embroidery for your specific brand of machine.
Take a little time today to play with each of the quilt block styles, and then stitch up a sampler table runner or wall hanging to liven up your home or workspace!
Fun Facts to Know and Tell
Did you know that you can create and save your own unique stitch motifs into the MyMotifs folder in PREMIER+™ Create in the ULTRA package, and then design motif quilt blocks with the QuiltBlock Wizard, utilizing your own custom stitch motifs?
Ensure that you have downloaded the PREMIER™ Embroidery System 11.3 Update through Smart Update in PREMIER+™ Configure.
Best wishes from PREMIER+™
PS: Watch for the PREMIER+™ newsletter next month as we look at the functions of Encore, and discover creative ways to multiply your existing embroidery designs into many new looks!