
Premier+™ Software Newsletter - May 2016
Welcome to the Premier+™ newsletter. Take a look at the Change Hoop function, where to use right-click, and the difference between the Quick Create, Freehand Create, and Precise Create tabs in the Create module.
Inspired Icons
Inspired Icons
Change Hoop ![]() , now located on the Quick Access bar in the Premier+™ Embroidery System, makes it much easier to change the hoop no matter which tab you are working on.
The Change Hoop function is also located on the View tab in both the Premier+™ and 6D™ Embroidery Systems.
, now located on the Quick Access bar in the Premier+™ Embroidery System, makes it much easier to change the hoop no matter which tab you are working on.
The Change Hoop function is also located on the View tab in both the Premier+™ and 6D™ Embroidery Systems.
You can also use the shortcut Ctrl + H from any tab to bring up the Hoop Selection dialog box. Let's review how this function works... Use Hoop Selection to choose the hoop size you wish to use. Set the hoop size according to the size of your embroidery or the hoop you wish to use for stitching out, or enter any other desired size. The hoop information is stored in your .vp4 embroidery file, and used for your initial Export settings. In the 6D™ Embroidery System the hoop size is remembered for when you next open the program, but it is not stored within your embroidery file.
The drop-down list of Hoop Groups shows all the machine Hoop Groups. The drop-down Hoop Size list shows the hoops in the chosen Hoop Group. Select the desired hoop size and a picture of the hoop will be shown in the Preview.
Select Natural or Rotated orientation according to the shape of the embroidery that is to fit in the hoop. Natural orientation is similar to the way the hoop would appear when you sit in front of your machine; note the position of the bracket. (In the 6D and 6D Embroidery Systems the orientation is described as Vertical or Horizontal.)
To enter a hoop size that is not listed in any of the Hoop Groups, click the Enter Hoop Size box so that it is selected (checked). The Width and Height boxes will become available. You can enter any size from 10mm to 4000mm. The preview shows the shape of the hoop you enter. If you position the arrow pointer over the box without clicking, the alternative units and range will be shown.
Module Mystique
Module Mystique

This month we will look at the different create tabs in the Premier+™ Create Module, available in PREMIER+™ ULTRA. There are three tabs: Quick Create, Freehand Create and Precise Create. They differ mainly in the way the stitch areas are created, but there are some tools found only in Quick Create or only in Freehand and Precise Create.
Use the features of the Quick Create tab to create design areas automatically. Select the desired function, according to the type of stitches you want over the picture area you are about to select. Then, click in the desired area of the picture for QuickStitch functions or on the desired line for QuickTrace functions.

For example, select Pattern Fill and No Line as shown above. Click QuickStitch ![]() , then click inside the left balloon to fill with stitches. Change the color, then click inside the next balloon. Change color,
then click inside the third balloon. Change the color to black. Select the Double Trace, then click on each of the balloon strings.
, then click inside the left balloon to fill with stitches. Change the color, then click inside the next balloon. Change color,
then click inside the third balloon. Change the color to black. Select the Double Trace, then click on each of the balloon strings.

When using Freehand Create functions, lines and areas are created by drawing outlines on the design with a pen on a graphics tablet, or by dragging with the mouse.

With the Precise Create functions, lines and areas are created by placing a series of points that define the outline.
Freehand and Precise Create have the same features, but the manner in which you use the tools differ. Let's look at how these tools work with the same balloon picture on the Precise Create tab.
First, select Pattern Fill and No Line. Then select Create Area or Line ![]() . Click around the first balloon placing points to follow the line. Right- click to end the tool and set the area with stitches. Continue in the same manner as above for the other two balloons.
. Click around the first balloon placing points to follow the line. Right- click to end the tool and set the area with stitches. Continue in the same manner as above for the other two balloons.
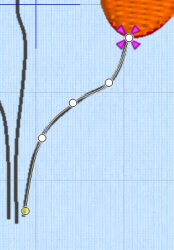
There is no Trace command on this tab. Turn off Pattern Fill then turn on Double Stitch. Click to place points along the line of the string. Right-click to end the tool and set the line with stitches.
Creating Shapes automatically is an additional feature available only on the QuickStitch tab. Creating satin columns, Feathered Satin, Richelieu Bars and Tapered Motifs as well as some command stitches are additional functions available only on the Freehand and Precise Create tabs.
Tips and Techniques
Tips and Techniques
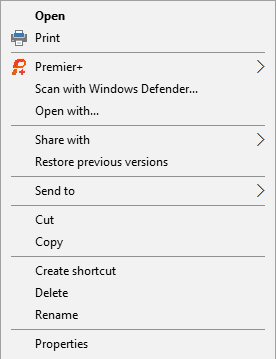
Right-click is one of the most important techniques you will learn in your embroidery software. Right-click is the way either to access a context menu, as in the Premier+™ Windows® Explorer plug-in shown here, or to signal to the software that you have finished using one of the tools available.
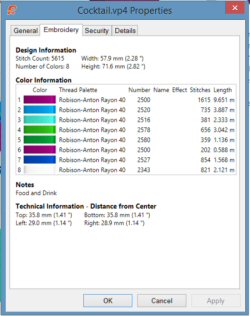
When using the Windows® Explorer feature, you use right-click to access the context menu. From this menu you can Print a template, send the design to a USB stick or directly to our embroidery machine. You can also open the properties to see more information about the design.
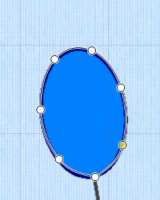
The other important use of right-click is to end a tool. For example, when using Freehand Point Select ![]() to select a block of stitches you click a series of points to create an irregular outline of straight and curved lines around the desired area,
then right-click when the area is complete. New tools that use this feature can be found on the Appliqué and Decoration tabs in Premier+™ Embroidery.
to select a block of stitches you click a series of points to create an irregular outline of straight and curved lines around the desired area,
then right-click when the area is complete. New tools that use this feature can be found on the Appliqué and Decoration tabs in Premier+™ Embroidery.
Fun Facts to Know and Tell
Did you know you can add a thread to your My Thread Database in the Premier+™ Thread Cache module? Simply go to the My Thread Database tab and click on Add New Thread ![]() . It can be a shade from an existing table, or a totally new thread from a new manufacturer.
. It can be a shade from an existing table, or a totally new thread from a new manufacturer.
Best wishes from Premier+™
P.S. Watch for the Premier+™ newsletter next month as we look at the Select Style icon on the SuperDesign tab, Opening Designs, and how to create a Satin Area in the Create module.