
Premier+™ Software Newsletter - June 2016
Welcome to the Premier+™ newsletter. This month we will look at the Select Style icon on the SuperDesign tab, Inserting vs Opening Designs, and how to create a Satin Area in the Create module.
Inspired Icons
Inspired Icons
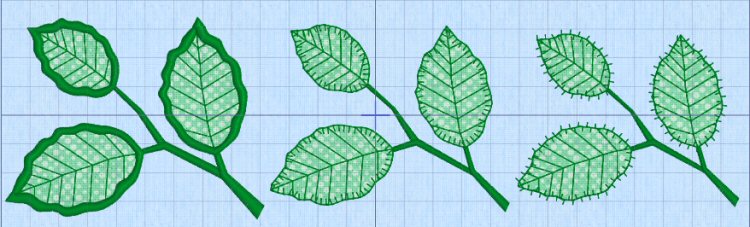
Select Style is a new icon ![]() in Premier+™ Embroidery that can be found on the SuperDesigns tab in the embroidery module. Depending on the SuperDesign category,
the selection can vary for that design. For example, if you choose a design in the Appliqué category, you can select a satin border, or a Motif.
in Premier+™ Embroidery that can be found on the SuperDesigns tab in the embroidery module. Depending on the SuperDesign category,
the selection can vary for that design. For example, if you choose a design in the Appliqué category, you can select a satin border, or a Motif.
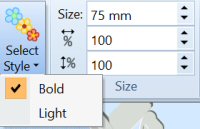
The three different border options for the Appliqué leaves are shown above. You have two motif choices, and you can change to any motif you would like. If you choose a Felting design from the Effects Category you can select Bold or Light for the style. Other SuperDesigns such as the Celebrations category have options of Color (fill) style or Line (outline)
Module Mystique
Module Mystique

This month we will look at how to create a Satin Area in the Premier+™ Create module. Use QuickStitch Satin ![]() to fill an area with satin stitches automatically, by clicking
in a color area of the picture. Set stitch options before creating, or after creating, right-click an area and use Fill Area and Line properties.
to fill an area with satin stitches automatically, by clicking
in a color area of the picture. Set stitch options before creating, or after creating, right-click an area and use Fill Area and Line properties.
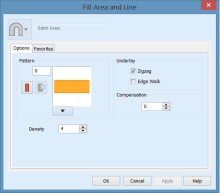
Change density, pattern and underlay settings for satin areas, or even change to another stitch type such as a pattern fill area. You can change all visible or selected satin areas with Global Properties, or by selecting the objects to change and changing one of them in Fill Area and Line properties. Stitch angle lines and start and end points can be adjusted on satin areas individually.
QuickStitch™ Satin works best with relatively simple areas of the picture that do not have any complex branches. Freehand or Precise Create should be used for more complex designs.
Use Precise Satin Area ![]() or
Freehand Satin Area
or
Freehand Satin Area ![]() to define the edge of an area filled with satin stitch. Satin areas are best suited to shapes without branches. If there are branches
that double-back on the main part of a satin area, the satin area may not give the desired result.
to define the edge of an area filled with satin stitch. Satin areas are best suited to shapes without branches. If there are branches
that double-back on the main part of a satin area, the satin area may not give the desired result.
In the 6D™ and 5D™ Design Creator modules, the tools work in a similar way, but some have different names. The icons are larger. Precise Satin Area is called
Freehand Point Satin Area and Freehand Satin Area ![]() is called Freehand Tablet Satin Area
is called Freehand Tablet Satin Area ![]() .
.
Tips and Techniques
Tips and Techniques
What happened to the blue camera from earlier embroidery software in the Premier+™ Embroidery System? It has been replaced by the
Insert Design ![]() command located on the quick
access toolbar at the top of the screen. Insert Design
command located on the quick
access toolbar at the top of the screen. Insert Design ![]() places designs in the currently open design window using the Windows Explorer Plug-In.
places designs in the currently open design window using the Windows Explorer Plug-In.
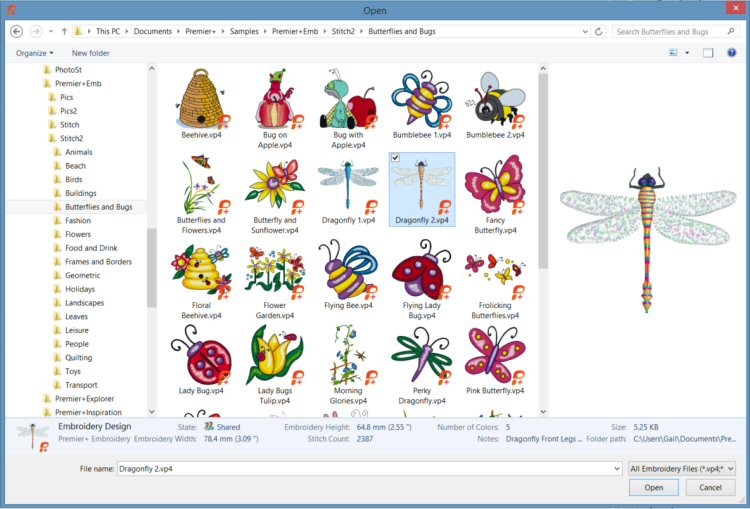
Use Open ![]() to load an existing embroidery, replacing the project in the current window. Premier+™ Embroidery displays the Open dialog box so you can choose an embroidery to open.
Files in .vp4 format will be loaded in the correct hoop, with background and groups exactly as saved. Alignment stitches will be retained.
to load an existing embroidery, replacing the project in the current window. Premier+™ Embroidery displays the Open dialog box so you can choose an embroidery to open.
Files in .vp4 format will be loaded in the correct hoop, with background and groups exactly as saved. Alignment stitches will be retained.
While the result is different, the dialog box for Insert Design and Open is the same. The Windows Explorer Plug-In is used to browse through your designs, which means you can see all the information about a design without leaving the Premier+™ software and before inserting or opening the design file.
Fun Facts to Know and Tell
Did you know a Search feature is available on the SuperDesign tab? Simply enter one or more words to show all SuperDesigns that match.
Best wishes from Premier+™
P.S. Watch for the Premier+™ newsletter next month as we look at the Tie On and Tie Off icons in Modify, how Hide Object Types work in Create, and how to make a Continuous Column design in Create.