
Premier+™ Software Newsletter - July 2016
Welcome to the Premier+™ newsletter. This month we will look at how to use the Tie On and Tie Off icons in Modify, how Hide Object Types work in Create, and how to create a Continuous Column design in Create.
Inspired Icons
Inspired Icons
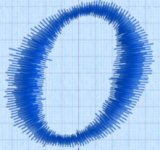
Tie on and Tie Off icons can be found in the Premier+™ Modify Module and in the 6D™ or 5D™ Stitch Editor Plus modules on the Modify tab. Create a tie stitch automatically, to hold down the stitching at the point you click. In this design a Tie Off stitch is shown at the top right of the stitching.
Typically, tie stitches are used at the beginning and end of areas of satin or fill. You can add tie stitches to an embroidery where sections are coming loose after stitching out, so it is a very useful tool to improve a design that may not have been perfectly digitized.
Use Insert Tie On ![]() to add a tie stitch at the beginning of the stitch area to be secured. The stitches making up the tie stitch are
inserted in the embroidery before the stitch point selected.
to add a tie stitch at the beginning of the stitch area to be secured. The stitches making up the tie stitch are
inserted in the embroidery before the stitch point selected.
Use Insert Tie Off ![]() to add a tie stitch at the end of the stitch area to be secured. The stitches making up the tie stitch are inserted in the embroidery after
the stitch point selected.
to add a tie stitch at the end of the stitch area to be secured. The stitches making up the tie stitch are inserted in the embroidery after
the stitch point selected.
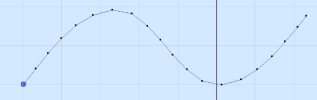
To illustrate how the tool works, we created a simple curved line in Create without tie stitches automatically added. After selecting the Tie Off tool, then clicking on the last stitch, you can see that stitches have been added to secure the thread. This is shown in the picture at the beginning of the section.
Module Mystique
Module Mystique
This month we will look at how to create a Continuous Column in the Create module. There are four types of Columns available:
Satin Column ![]() , Feathered Satin
, Feathered Satin ![]() ,
Richelieu Bars
,
Richelieu Bars ![]() and
Tapered Motifs
and
Tapered Motifs ![]() . All four types are created in the same manner.
. All four types are created in the same manner.
To make a column, use the following steps...
 Choose the Freehand Create or Precise Create tab.
- Set the Options, then select the desired column type.
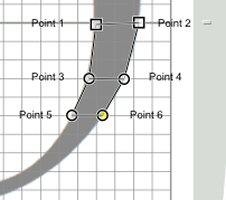
- Click on the work area to place the first point in the column.
- Click to place Point 2 to start the other side of the column. A line appears to indicate the width of the column.
- Click to place Points 3 and 4 for the next section of the column.
- Repeat to place points indicating the width and position of the column.
- Right-click to finish the column. It appears in the work area.
- Right-click a second time to deselect the function, or simply select another tool.
- If desired, click the column to select it, and then right-click it to open the Column dialog. Here you can change the settings, or select a different column type from the drop-down list.
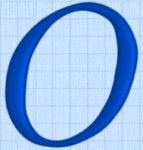
Use Satin Column ![]() to place a column of straight or curving satin in the work area. The satin is formed from zigzag stitches that fill the column from one side to the other.
Click the Options button to set density, compensation, pattern for wide columns and underlay.
to place a column of straight or curving satin in the work area. The satin is formed from zigzag stitches that fill the column from one side to the other.
Click the Options button to set density, compensation, pattern for wide columns and underlay.
Use Feathered Satin ![]() to create columns of satin that are feathered on one, or both sides. A Feathered Satin column uses zigzag stitches where the start and end points of
the stitches are random rather than all parallel. Create feathered satin for realistic feathers or fur in animal designs, or shading in flowers. Typical shapes are arches,
semicircles, circles and ovals, and squares, rectangles and triangles are also possible. Click the Options button to select whether one or both sides of the column will be
feathered, and set the Stitch Length and Density. Use feathered satin for realistic feathers or fur in animal designs, or shading in flowers. Typical shapes are arches, semicircles,
circles and ovals, and squares, rectangles and triangles are also possible.
to create columns of satin that are feathered on one, or both sides. A Feathered Satin column uses zigzag stitches where the start and end points of
the stitches are random rather than all parallel. Create feathered satin for realistic feathers or fur in animal designs, or shading in flowers. Typical shapes are arches,
semicircles, circles and ovals, and squares, rectangles and triangles are also possible. Click the Options button to select whether one or both sides of the column will be
feathered, and set the Stitch Length and Density. Use feathered satin for realistic feathers or fur in animal designs, or shading in flowers. Typical shapes are arches, semicircles,
circles and ovals, and squares, rectangles and triangles are also possible.
Use Richelieu Bars ![]() to place bars in the work area. Richelieu bars are short sections of satin set perpendicular to the direction of the column. They are often used in
lace designs. Click the Options button to set the width and density of the satin bars, the number of bars or the gap between the bars.
to place bars in the work area. Richelieu bars are short sections of satin set perpendicular to the direction of the column. They are often used in
lace designs. Click the Options button to set the width and density of the satin bars, the number of bars or the gap between the bars.
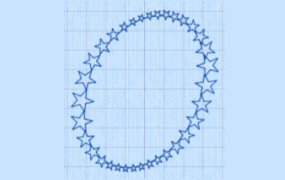
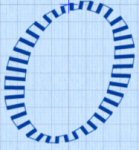
Use Tapered Motifs ![]() to create a line of motifs that varies in size according to the width of the column, as shown at the beginning of the section.
Tapered motifs are often used in lace designs. Click the Options button to set the motif type, stitch length, and either the number of motifs or the gap between them.
to create a line of motifs that varies in size according to the width of the column, as shown at the beginning of the section.
Tapered motifs are often used in lace designs. Click the Options button to set the motif type, stitch length, and either the number of motifs or the gap between them.
Tips and Techniques
Tips and Techniques
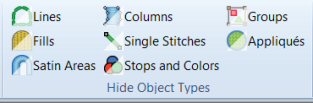
Hide Object Types allows you to focus on the part of the design you want to edit in Premier+™ Create (called Filters in 6D™ or 5D™ Design Creator). The Hide Object Types (filter) buttons are used to hide and show the objects in the design according to the type of object and/or by color block sequence. This helps you analyse a design, especially when you want to adjust an area.
When a filter is used to hide objects, the objects are hidden in the work area and the FilmStrip. The filters are: Lines, Fills, Satin Areas, Columns, Single Stitches, Stops and Colors, Groups and Appliqués. If there are no objects of the relevant type in the design, or they are all already hidden by other means, the filter button cannot be clicked down.
Use any combination of color block display, object filters, draw range and FilmStrip options to hide objects. Hiding objects leaves the visible objects available for other functions without affecting the hidden objects. Use this to help when you need to select a particular set of objects that might be difficult to isolate directly with the Select functions. For example, you may wish to change the pattern in all fill areas of one type using Global Properties, or select a number of objects to copy them.
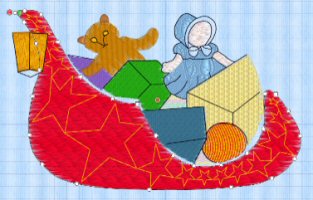
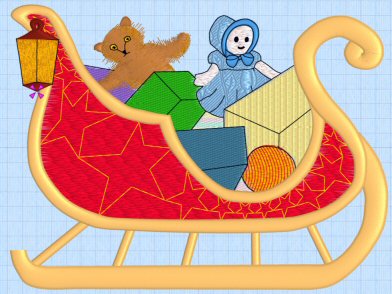
The design pictured is from the Samples folder within the Create/Edo folder with all object types in view. To be able to see the red part of the sleigh better, hide
(or filter) the columns objects. To see the entire design again, click Display All Objects ![]() .
.
Fun Facts to Know and Tell
Did you know that in the Premier+™ Embroidery System the Hoop Orientation has been changed from Vertical and Horizontal to Natural (how it attaches to the embroidery unit) and Rotated (the way that fits the computer screen best)?
Best wishes from Premier+™
P.S. Watch for the Premier+™ newsletter next month as we look at Importing Threads from an embroidery, renaming databases in Premier+™ Thread Cache and grouping in Premier+™ Embroidery.