
Premier+™ Software Newsletter - January 2016
Welcome to the Premier+™ newsletter. This month we will look at Thread and Needle effects, Satin stitch properties, and the ExpressMonogram Wizard. We are also pleased to inform you that there is a Premier+™ update available (version 11.1), which provides additional appliqué and decoration options, in addition to optimized display for high-resolution 4K monitors. Use Smart Update in Premier+™ Configure to download it today!
Inspired Icons
Inspired Icons
Many fun thread and needle effects can be seen in the main 3D View ![]() in the Premier+™ Embroidery System
and in Life View
in the Premier+™ Embroidery System
and in Life View ![]() in the 6D™ Embroidery System. The felting effect shown here can be seen only in the PREMIER+™ software.
in the 6D™ Embroidery System. The felting effect shown here can be seen only in the PREMIER+™ software.
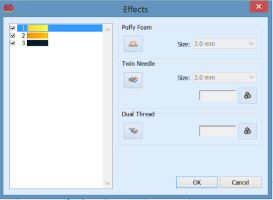
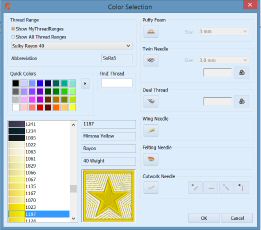
In addition to showing Puffy Foam, dual threads, and twin needle, wing and felting needles are now available in Premier+. These options are set in the Color Selection dialog box. All effects are stored in the vp4 format. A rose felting design from the SuperDesign set Felting Needle 2 in the Effects category is shown above. Notice the symbol next to the color indicating it is a felting needle design. When you export a felting needle design, the setting to flip the design is automatically selected.
Puffy foam, dual threads, and twin needles are available in the 6D™ Embroidery System (as well as in the TruEmbroidery™3 Software Life View for those using Mac® computers). Other effects such as metallic, multi-color, and varying thicknesses in the thread can be seen in the main 3D View in all versions, including earlier software such as the 5D™ Embroidery System.
Module Mystique
Module Mystique
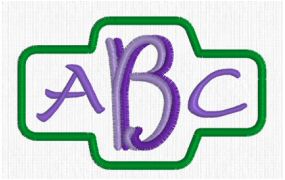
This month we will look at what's new about using the ExpressMonogram Wizard in your Embroidery or Embroidery Extra module. In the Premier+™ Embroidery System the Monogram properties are retained for easy re-editing when you save the design using the .vp4 format.
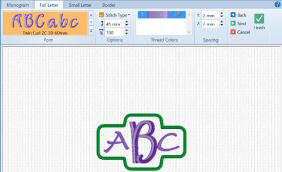
Simply open the design, then right-click and select Properties. The Monogram Wizard opens for editing. This monogram features one of the new twin needle fonts, Twin Curl 2C 30-60mm in the Effects category. (Tip: When using the Twin Needle effect, select a hoop in the natural rather than rotated orientation to visualize the final stitchout more easily!)
In the 6D™ and 5D™ Embroidery Systems we could save the monogram file, then reopen it in the wizard to modify.
Tips and Techniques
Tips and Techniques
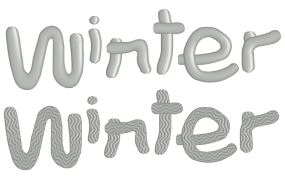
In the PREMIER+™ software all fill patterns are now available for a satin column. You can also use a multi-color gradient scheme. The Kids font is shown above with the standard fill and below with fill 231 from the Waves category.
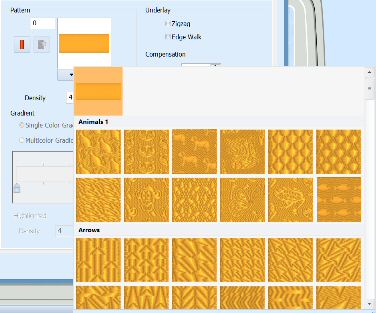
Simply click on the drop down arrow below the pattern to select from the 250+ patterns available. To change the Density to a Gradient, select a single color or Multi-color Gradient.
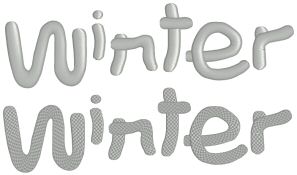
In earlier software packages there are the standard 12 patterns. The density can be changed, but not to a Gradient density or multi-color gradient. Here the same Kids font is shown with the standard fill and below with fill 9.
Use the Gradient settings to change the density settings and the color gradient of the satin. The color on a satin column can change over a range, or have multiple color changes across the area. This is ideal for gradual color changes such as subtle shadow effects.
Use Single Color Gradient to change the density across a satin column with only one color. Set a value for the start and end density markers for the fill, and the density gradually changes between the two values. Add multiple markers for a more complex pattern. The markers can each take a value of 2 to 80, which means you can reverse the gradient simply by swapping the start and end values. Use the adjustment marker above the gradient bar to change the gradient across the area.

Use Multicolor Gradient to change the color across a satin column with only one density. Set colors for the start and end markers for the area, and the color gradually changes between the two values. Use the marker above the gradient bar to change the color gradient across the area.
Fun Facts to Know and Tell
Did you know that the beautiful bird designs pictured on the PREMIER+™ ULTRA, PREMIER+™ EXTRA and PREMIER+™ EMBROIDERY boxes can be found in the Premier+\Samples\Premier+Inspiration\Wildlife\Stitch folder?
Best wishes from Premier+™
P.S. Watch for the Premier+™ newsletter next month as we look at the Restrict Groups icon, how to change the stitchout order, and what's new in the Quilt Block Wizard.