
Premier+™ Software Newsletter - February 2016
Welcome to the Premier+™ newsletter. This month we will look at the Restrict Groups icon, how to change the stitchout order, and what's new in the Quilt Block Wizard. Also, check out the Learning Center where we have some new videos on printing appliqué fabric and creating appliqué designs for automated cutters!
Inspired Icons
Inspired Icons
Restrict Groups ![]() is a new icon in Premier+™. When a group is selected and then you click Restrict Groups, the designs remain grouped, but they can be moved, rotated, mirrored and resized or scaled individually.
Restrict Groups can be found on the Home tab.
is a new icon in Premier+™. When a group is selected and then you click Restrict Groups, the designs remain grouped, but they can be moved, rotated, mirrored and resized or scaled individually.
Restrict Groups can be found on the Home tab.
The first design in the group is selected initially when Restrict Groups is chosen.
Click the desired embroidery, use the tab key or Next Design ![]() and Previous Design
and Previous Design ![]() to select.
to select.
The Encore function automatically groups the individual items that are being encored. Restrict Groups makes it really easy to move a piece of the encored design without going to the Modify tab. In the design at right the corner elements have been mirrored and positioned closer to the corners.
Module Mystique
Module Mystique

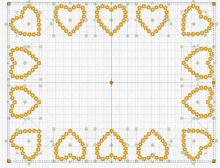
This month we will look at what's new in the Premier+™ Quilt Block Wizard. There is a new choice on the Select Fill Pattern Page, Curved Crosshatch. Curved Crosshatch fills create a feeling of depth and perspective. They are especially popular for quilting, and free-standing lace.
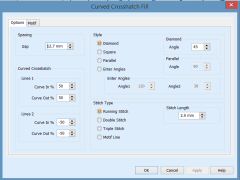
In addition to being able to change the spacing between the lines, the stitch type and length, you can also change the curve of the lines. You can change the style of the crosshatch; for example, choosing parallel for a different look than the initial diamond. Try using small motif stitches along the curved lines for a unique effect! In the example shown, the margin between the embroidery design and the quilting fill is set to 0, so the bullfinch appears to "fly away" from the quilt block.
Tips and Techniques
Tips and Techniques

Did you know that you can change the stitchout order of the pieces of your design? This feature is available in all current versions of the software.
The Layout Order ![]() drop-down menu can be found on the Home tab in Premier+™ Embroidery and 6D™ Embroidery.
drop-down menu can be found on the Home tab in Premier+™ Embroidery and 6D™ Embroidery.
Move Forwards ![]() , Move Backwards
, Move Backwards ![]() ,
Move to Front
,
Move to Front ![]() and Move to Back
and Move to Back ![]() , are used to move embroideries and groups within the design. Embroideries at the 'back' of the design will be stitched out first. To change the
stitchout order of embroideries within a group, use Restrict Groups
, are used to move embroideries and groups within the design. Embroideries at the 'back' of the design will be stitched out first. To change the
stitchout order of embroideries within a group, use Restrict Groups ![]() on the Home tab.
on the Home tab.
Move Forwards brings the selected embroidery or group one step closer to the front. Move Backwards brings the selected embroidery or group one step closer to the back. Move to Front places the selected embroidery or group at the front. Move to Back places the selected embroidery or group at the back.
In the design shown at the beginning of the section, the bee (from the Butterflies and Bugs folder) was placed in the design area first, then the lettering, then the frame. To stitch the frame first, select the frame then Layout Order, then Move to Back. To stitch the lettering next, select the lettering then click Layout Order, then Move Backwards.
Fun Facts to Know and Tell
Did you know that there are over 700 frames and flourishes, including some with specialty effects in the Premier+™ Embroidery System, that is 150 more than in the 6D™ Embroidery System?
Best wishes from Premier+™
PS: Watch for the Premier+™ newsletter next month as we look at the Export tab options in Configure, Encore, and what's new in Modify.