
Inspired Icons
Inspired Icons
The Previous Design and Next Design icons that are found on the Home tab in 6D™ Embroidery are new to the 6D™ Embroidery System. These tools help you to easily select a design on the screen. Let's see how they work.
The Next Design and Previous Design icons can be found on the Home tab. Use Next Design  to select the next design in the stitchout order.
Use Previous Design
to select the next design in the stitchout order.
Use Previous Design  to select the previous design in the stitchout order. In the 5D™ Embroidery software we used the tab key to cycle through to the
next design in the stitchout order with no way to view the Previous Design.
to select the previous design in the stitchout order. In the 5D™ Embroidery software we used the tab key to cycle through to the
next design in the stitchout order with no way to view the Previous Design.
Module Mystique
Module Mystique

Last month we looked at how to use a Motif as a fill in Design Creator. Now, let's see how to create your own Motif for Motif Fills and Motif Lines. This feature is available in both the 6D™ and 5D™ Design Creator modules.
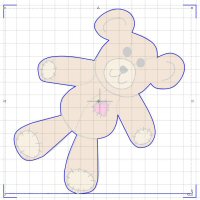
When the module starts up, choose the option Load a Background Picture into the Draw Window, then select the Picture, or if you want to draw your Motif without a reference,
choose Start a New Design with No Picture, then choose the Draw Window. Select Freehand Draw  or
Polygon Draw
or
Polygon Draw  , then trace around the background picture or draw your motif.
Once you have the motif drawn, click Export to MyMotifs
, then trace around the background picture or draw your motif.
Once you have the motif drawn, click Export to MyMotifs  .
.
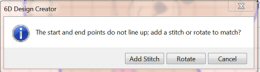
If the start and end nodes are not on the same horizontal line, you will see the following message. Cancel to edit the design or accept adding a stitch or rotating the design.
Technique Tune-Up
Technique Tune-Up
The Border/Appliqué tools make a new embroidery by adding a satin border, with or without stitches for appliqué. They are found on the Modify tab in 6D™ Stitch Editor Plus, and in both 5D™ Stitch Editor and 5D™ Stitch Editor Plus.
The border and Appliqué tools work the same way. The Appliqué tool adds the placement and tack-down lines in addition to the satin border. So how do you use these tools?
Draw the desired border/appliqué shape. Use either a preset shape with Draw Border/Appliqué Shape or draw your own shape with Freehand Tablet or Freehand Point Border/Appliqué. Move, scale, rotate and mirror the border/appliqué shape as desired. Use the desired Create Border/Appliqué function to create the new embroidery. The new embroidery is shown in a new window on the screen and has '_b' added to the name of the original embroidery. The original embroidery is not affected.
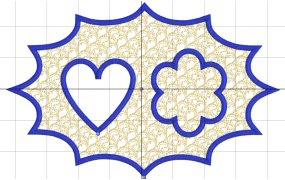
Use the Create Border/Appliqué options to create a new embroidery with a satin border in the shape you have drawn and placed. There are three Create Border/Appliqué functions: External, Internal and Overlay. Create External Border/Appliqué removes all stitches outside the border.
Create Internal Border/Appliqué removes all stitches inside the border, while Create Overlay Border/Appliqué, shown together with an internal border at the start of the section, places a border on top of the design's original stitches.
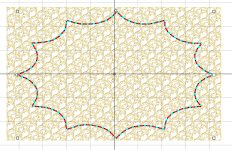
A Color Change is placed at the beginning of the satin border, using the Border Stitch Color in Border Options. The border also uses the Width and Density set in Border Options.
When appliqué is created from a border shape, additional stitches are added at the beginning of the embroidery for placing appliqué fabric. Use these options to determine how these stitches are added. The satin border used to finish the appliqué uses the Satin Border options.
 QuiltDesign Creator
QuiltDesign Creator
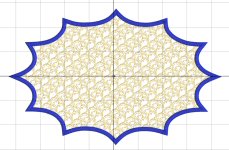
Use the Knife tool in QuiltDesign Creator to cut designs apart, either to create separate objects or to insert an object into your quilting design. Let's take a closer look at how to use the Knife.
The Knife tool  cuts the currently selected object, whether it is a line, shape or group, into two parts. One part is automatically selected. The Knife is deselected automatically after use.
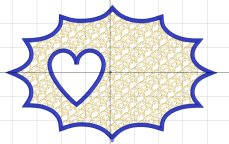
Any filled shapes will be converted into lines when they are cut with the Knife. As the cut lines will still have a fill type assigned to them, the fill will be displayed again if those lines are joined to make another shape, or a different shape.
In this example, the stipple design was loaded from the MiniPic library. Click Object Select  , then click the object to ensure it is selected. The design is now surrounded
by a box. Click the Knife Tool icon . Click to one side of the object where you want to cut, then click again on the other side of the object. A straight line representing the path of the
cut is displayed. Right-click to cut diagonally across the line with the Knife. The line is divided in two, and one section is selected. Then delete the part of the design where the cut was
made with the Knife tool.
, then click the object to ensure it is selected. The design is now surrounded
by a box. Click the Knife Tool icon . Click to one side of the object where you want to cut, then click again on the other side of the object. A straight line representing the path of the
cut is displayed. Right-click to cut diagonally across the line with the Knife. The line is divided in two, and one section is selected. Then delete the part of the design where the cut was
made with the Knife tool.
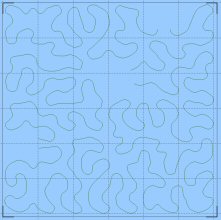
Finally, you can add the heart shape and connect the start and end of the heart to the stipple design, as pictured above. It's that easy to modify a simple stipple pattern fit the theme of your quilt!
Fun Facts to Know and Tell
Did you know there are 36 frames specially designed for Puffy foam in the 6D™ Embroidery module?
Best wishes from 6D™
P.S. Watch for the 6D™ newsletter next month as we look at how to rotate a design 45 degrees, discuss command markers, take a peek at the Sketch module, and see how to convert a quilting design to lines.

VANTAGE™ Embroidery Software Support is a membership program which provides education and support of the HUSQVARNA VIKING® & PFAFF 6D™ and 5D™ Embroidery Systems, QuiltDesign Creator, TruEmbroidery™ 3 and TruEmbroidery™ Software for Mac® computers. The VANTAGE™ program is currently available in the US, Canada, and Australia. Please visit your authorized HUSQVARNA VIKING® or PFAFF® dealer to learn more and sign up today.

#289 Labels in the Hoop (920432096)
These lovely embroideries can be created in endless combinations! The designs include adorable labels, frames, texts, designs, numbers and much more. You can make freestanding labels or use the embroideries as appliqués. This HUSQVARNA VIKING® mini collection of 70 embroideries is available next month.
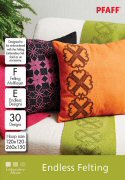
#487 Endless Felting (821101096)
Embroider beautiful felted creations with these wonderful motifs! The collection includes 30 elements designed for multi-layer felting. Individual motifs and endless combinations give you plenty of options for your special project. Embroider and enjoy! This PFAFF® collection is available this month.