
Premier+™ Software Newsletter - December 2015
Welcome to the Premier+™ newsletter. This month we will look at Exporting Appliqué Pieces, Decorations, and the Create module.
Inspired Icons
Inspired Icons
If you have an appliqué embroidery design, you can now save or print appliqué outlines ready for cutting. (In earlier software you can visualize appliqué outlines but not store them
within your file.) Under the File tab in most PREMIER+™ modules, you will find the Export Appliqué Pieces icon ![]() .
.
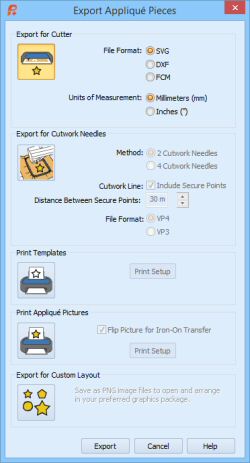
There are five appliqué piece export methods*:
* Screenshot taken in Premier+ Embroidery System version 11.1, which will be available in January.
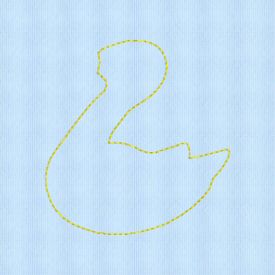
Here is the duck exported for cutwork needles. Just hoop up your duck fabric, and use cutwork needles 1 and 2 (red & yellow). You now have fabric cut that will fit your appliqué duck perfectly.
Recommended file formats for some popular cutters:
| Cutter | Software | Export Format |
|---|---|---|
| Cricut Explore® | Cricut Design Space 1.091 | DXF (inches) |
| KNK Zing Air® | Make the Cut! 4.6.1 (Zing Plugin 2.1.0) | SVG (inches) |
| Silhouette Cameo® | Silhouette Studio 3.6.39 ss | DXF (millimeters) |
| Brother ScanNCut® | ScanNCutCanvas 2.1.0 | FCM (Coming in January) |
Module Mystique
Module Mystique

This month we will look at the new Premier+™ Create module. In the 5D™ and 6D™ software, we called this module Design Creator. Create has a whole new look, to include the Ribbon bar. The Filmstrip is always on the left and the Design Panel is always on the right.
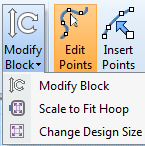
There are so many new things to tell you about this module; this month we will start with just a few of them. All the tools are located on the ribbon bar. On the Home tab is a tool called Modify Block. Located under the drop down are three options.
Use the Modify Block ![]() dialog box to show and change the size and rotation of the currently selected block.
dialog box to show and change the size and rotation of the currently selected block.
Use Scale to Fit Hoop ![]() to resize the design in the work area proportionally, to fit within the boundaries of the hoop, centered in the hoop. This is useful to resize a whole design
to fit in a different hoop, although you need to consider whether to change settings or stitch types. For example, if you enlarge a design, it may be beneficial to add a pattern to wide satin columns.
to resize the design in the work area proportionally, to fit within the boundaries of the hoop, centered in the hoop. This is useful to resize a whole design
to fit in a different hoop, although you need to consider whether to change settings or stitch types. For example, if you enlarge a design, it may be beneficial to add a pattern to wide satin columns.
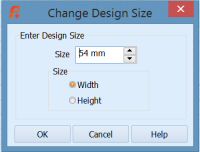
Use the Change Design Size ![]() dialog box to alter a design automatically to a new size, allowing for the stitch objects used. Resize the design to the desired width or height,
then click OK to show your changes in the work area.
dialog box to alter a design automatically to a new size, allowing for the stitch objects used. Resize the design to the desired width or height,
then click OK to show your changes in the work area.
Tips and Techniques
Tips and Techniques

The Decoration tab is new in the PREMIER+™ EXTRA and PREMIER+™ ULTRA packages. Add decoration to an existing design or change decoration of an existing design. We adjusted the pattern fills in this heart SuperDesign last month. Now we will add decorations!
Click Draw Shape ![]() to draw a shaped line of decorations on your project, using the shape currently selected in the gallery of preset shapes. Once placed, a decoration shape
is treated as a line of decorations. The design at the beginning of the section has a heart shape of 4mm crystals surrounding it.
to draw a shaped line of decorations on your project, using the shape currently selected in the gallery of preset shapes. Once placed, a decoration shape
is treated as a line of decorations. The design at the beginning of the section has a heart shape of 4mm crystals surrounding it.

Click Select Decoration ![]() to select individual decorations, or lines of decorations for editing or deleting. To change color, size or material,
click Properties
to select individual decorations, or lines of decorations for editing or deleting. To change color, size or material,
click Properties ![]() after selecting decorations. When a line or shape is enlarged, the number of decorations increases. It decreases as the line or shape is made smaller.
Use Ctrl and click to select a number of individual decorations, for instance to change the color for some beads in a Super Design.
after selecting decorations. When a line or shape is enlarged, the number of decorations increases. It decreases as the line or shape is made smaller.
Use Ctrl and click to select a number of individual decorations, for instance to change the color for some beads in a Super Design.

Click Place Individual ![]() to place decorations individually on your project. Click Place Individual and select a decoration type, material, color, size and angle in the Decoration Selection dialog.
Then click to place decorations.
to place decorations individually on your project. Click Place Individual and select a decoration type, material, color, size and angle in the Decoration Selection dialog.
Then click to place decorations.
Click Draw Line ![]() to place lines of decorations on your project. Select a bead, sequin, crystal or nailhead using your preferred material, size and color in the Decoration Selection dialog,
and then draw your line. Select the angle of Rotation, and choose whether the line of decorations will follow the line drawn (Follow Line), or if they will use the angle set in rotation (Stepped).
to place lines of decorations on your project. Select a bead, sequin, crystal or nailhead using your preferred material, size and color in the Decoration Selection dialog,
and then draw your line. Select the angle of Rotation, and choose whether the line of decorations will follow the line drawn (Follow Line), or if they will use the angle set in rotation (Stepped).
Click Decoration SuperDesign ![]() to insert a Decoration SuperDesign into your current project. Change the size, color and decoration type to complement your project.
to insert a Decoration SuperDesign into your current project. Change the size, color and decoration type to complement your project.
Click Delete Selection ![]() to delete the currently selected individual decoration, or line of decorations.
Click Break Up Line
to delete the currently selected individual decoration, or line of decorations.
Click Break Up Line ![]() to break up the currently selected line of decorations into individual
decorations for independent editing.
to break up the currently selected line of decorations into individual
decorations for independent editing.
Fun Facts to Know and Tell
Did you know there are 27 new Fonts in the PREMIER+™ ULTRA package including Appliqué, Effects (Felting, Twin Needle, Wing Needle), and several in the other categories.
Best wishes for happy holidays from Premier+™
P.S. Watch for the Premier+™ newsletter next month as we look at Thread and Needle effects, Satin stitch properties and the Monogram Wizard.