
Inspired Icons
Inspired Icons
Polygon Draw is a good way to draw either a curved line, or one with straight sections. The Polygon Draw tool is found in the Design Creator module on the Draw tab, which is available in the 6D™ and 5D™ Embroidery Systems.
Use Polygon Draw  to place points from which a line will be made. The minimum number of points is two (which forms a straight line).
Three points form an angled line, while the line becomes smooth after placing four or more points.
to place points from which a line will be made. The minimum number of points is two (which forms a straight line).
Three points form an angled line, while the line becomes smooth after placing four or more points.

Hold down Ctrl to place straight sections. Polygon Draw is enabled until another tool is selected.
Module Mystique
Module Mystique
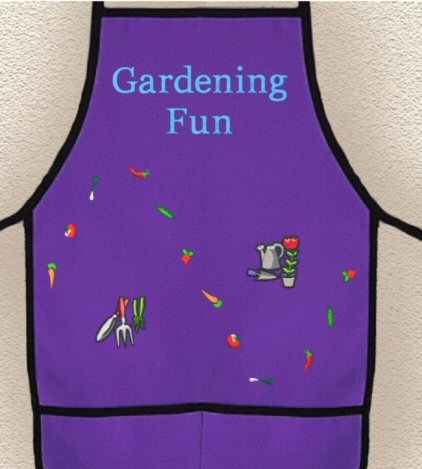
Would you like to create designs larger than your largest hoop? With Design Aligner you can split that large project to fit your hoop and you have complete control over splitting designs. Design Aligner can be found in the 6D™ / 5D™ / 4D™ Embroidery Systems.
This large apron embroidery was created using SuperDesigns, including some of the new ones. Don't forget to download the complimentary Smart Update with 54 new SuperDesigns included. Visualize and size your creation using the Background Wizard found on the View tab of 6D™ Embroidery Extra, or in 5D™ / 4D™ Vision.
Open the design in Design Aligner, then set the desired overlap between each hoop area. The minimum overlap is 1mm. The maximum overlap is half the shortest side of the chosen hoop. This means that hoops may not overlap more than 50%. This is so that adjacent horizontal split lines or adjacent vertical split lines may not cross each other.
Move the whole design left, right, up, or down to position the design in the overlap area to minimize cuts. This design needed to be moved left a little to prevent cutting through the letter "e". Move the markers around stitches in the design, as shown. Once you are satisfied with the way it will split, Split the design 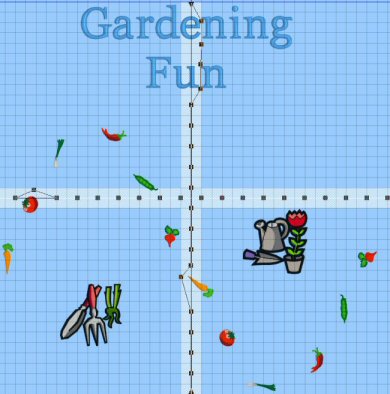
 , then save and print out any worksheets.
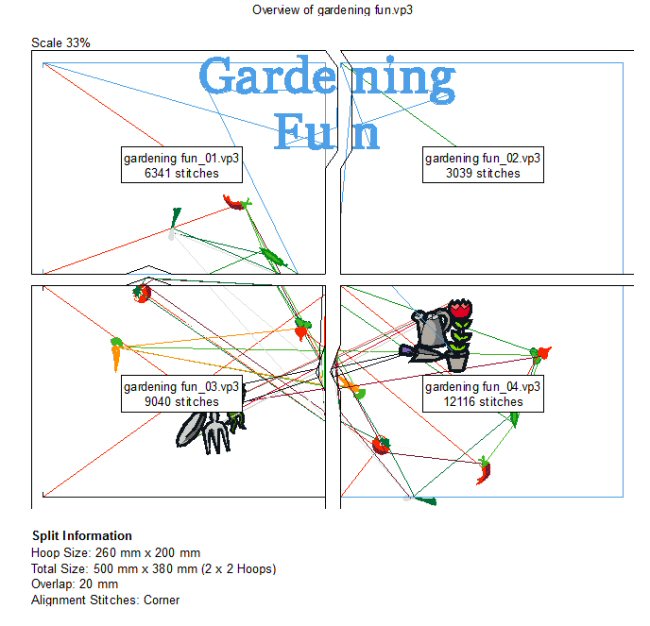
Technique Tune-Up
Technique Tune-Up
An Appliqué design can be created in many ways, depending on the type of appliqué you want. For a simple satin border around your design, try the ExpressDesign Wizard border option found in 6D™, 5D™, and 4D™ Embroidery Extra or Design Creator.
If you want to turn an existing design into an appliqué design, then 6D™ / 5D™ Stitch Editor Plus or 5D™ / 4D™ Stitch Editor is the module for you. If your design requires attention to the order of the appliqué pieces or you would like the appliqué to use a stitch other than a satin border, Design Creator is a must.
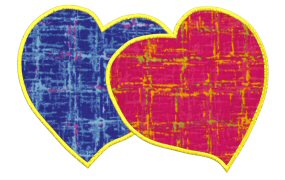
See the different effects that can be achieved using the hearts clipart with the ExpressDesign Wizard and Design Creator.

Create the design below using the ExpressDesign Wizard (Appliqué Border Option), and display it with appliqué fabric in the 6D™ Embroidery Extra View tab or in 5D™ or 4D™ Vision. Alternatively, make a design like the one with red and blue appliqué fabric in 6D™, 5D™ or 4D™ Design Creator. Use the Freehand Point Select Border with Appliqué option, and show the result with two contrasting fabrics.

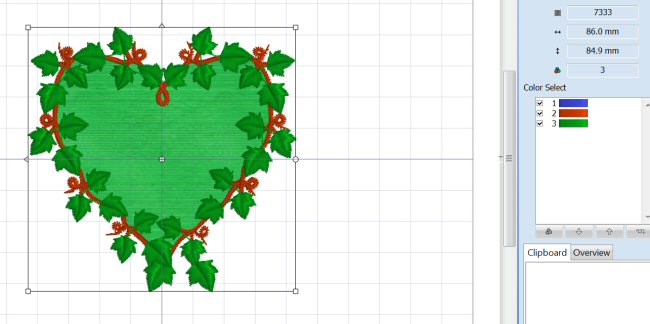
In the final project, use 6D™ Stitch Editor Plus to add Appliqué stitches to a wreath design. The Freehand Point Border tool allows perfect control when you place the border and the Overlay Appliqué method is used since it is not necessary to remove a section of the design. (Delete the satin border that was added; since there is already a satin line, the tool is used simply to add the placement lines.) Color 1 contains the placement line and the tack down line.
 QuiltDesign Creator
QuiltDesign Creator
If you want a quilting design to make a more continuous stitching path, use QuickTrace Design  .
The software converts the design to a picture, traces it and then opens a new tabbed page with the new version. The original is included as a background image.
.
The software converts the design to a picture, traces it and then opens a new tabbed page with the new version. The original is included as a background image.
Use QuickTrace Design when the design is created from a number of smaller designs. QuickTrace Design will convert the intersecting lines to continuous lines.
The new design is likely to stitch out with fewer jumps. Before using this feature, ensure that Automatic Route is selected in Preferences  .
Choose Left to Right route if you wish to 'chain' multiple copies for an edge-to-edge design.
.
Choose Left to Right route if you wish to 'chain' multiple copies for an edge-to-edge design.
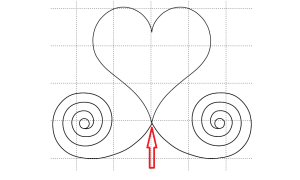
The design pictured below has a shape (the heart) and two MiniPics (the swirls), combined to create a larger design. If saved as is, it will start at the left and finish where the red arrow is pointing.
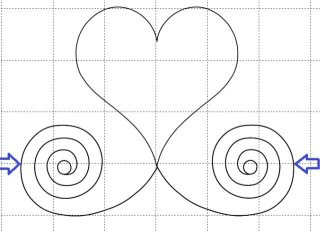
If you run it through the QuickTrace Design tool, it will start at the farthest left point and finish at the farthest right point, allowing you to stitch from one side of the quilt to the other without any movement or jump stitches. The blue arrows indicate the start and finish points.
Create a border from this design with the Encore  feature.

Create another border from this design by simply changing the gap to -1.7" to overlap the swirls.

Fun Facts to Know and Tell
Did you know there is an update available for 6D?
Open 6D™ Configure  , then click on Smart Update
  . The update contains six new sets of SuperDesigns.
Best wishes from 6D™
P.S. Watch for the 6D™ newsletter next month as we look at the Encore feature and the QuiltBlock Wizard!

VANTAGE™ Embroidery Software Support is a membership program which provides education and support of the HUSQVARNA VIKING® & PFAFF 6D™ and 5D™ Embroidery Systems, QuiltDesign Creator, TruEmbroidery™ 3 and TruEmbroidery™ Software for Mac® computers. The VANTAGE™ program is currently available in the US, Canada, and Australia. Please visit your authorized HUSQVARNA VIKING® or PFAFF® dealer to learn more and sign up today.
This month with VANTAGE™ Embroidery Software Support features Mastering Your Embroidery Software:"Adding Dimension to your Fill". In the Technology Corner, VANTAGE™ members will explore "Computer Preventive Maintenance Tips".
#284 Mega Endless Borders & Corners (920412096)
If you love quilting you need this new HUSQVARNA VIKING® collection (available next month)! It includes 36 amazing quilt designs. Fifteen embroideries are endless borders with corners for the HUSQVARNA VIKING® DESIGNER™ MEGA ENDLESS HOOP, and six designs start with four position stitches for easy matching when creating all-over-embroidered fabric.

#480 Projects in the Hoop (821077096)
This mini collection offers seven adorable projects in the hoop — create perfect little gifts like smart phone and tablet covers! It also includes 3 projects suitable for your sewing room. Hoop sizes for this PFAFF® collection (available next month) range from the creative™ METAL HOOP 180x30mm up to the creative™ DELUXE HOOP 360mmx200mm.