
Inspired Icons
Inspired Icons
Did you know that you can add a basting line around part or all of your embroidery? The Automatic Basting Line Around Visible Stitches  tool
is found in the 6D™ and 5D™ Stitch Editor Plus module on the Modify Page of the Control Panel. Use this tool to insert a rectangular basting line
automatically around the visible stitches. (This feature is not available in 5D™ Stitch Editor or 4D™ Stitch Editor.)
tool
is found in the 6D™ and 5D™ Stitch Editor Plus module on the Modify Page of the Control Panel. Use this tool to insert a rectangular basting line
automatically around the visible stitches. (This feature is not available in 5D™ Stitch Editor or 4D™ Stitch Editor.)
If you place the automatic basting line around all stitches in a project with one design, you can use this to secure the fabric and stabilizer before beginning embroidery.
What's great about this feature is that you can change the stitch length from the preset stitch length on your embroidery machine. You can also set the distance from the embroidery,
or margin width. Set the margin and stitch length on the General tab in Preferences  . Set the stitch length between 2.0mm and 8.0mm and the margin between 0mm and 20mm.
This feature is wonderful for creating your own cutwork needle designs, as it allows you to place a basting line at any point of the embroidery, not just at the beginning.
In 6D™ Stitch Editor Plus  you can also place a basting line around all the designs in a multipart project by clicking on Basting Line for All Designs .
Module Mystique
Module Mystique
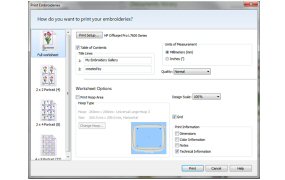
You can print one embroidery design, several designs, or a whole catalog of designs using the 6D™ Windows® Explorer Plug-In. (Similar features are found in 5D™ Organizer or 4D™ Organizer if you have an earlier software system).
If you have the 6D™ Windows® Explorer Plug-In, simply select one or several designs. (Shift-click to select a sequence, Ctrl-click to select a group of individual designs.) Then right-click. From the context menu, select Print and the Print Embroideries window opens. Select a catalog layout or print one or more design worksheets, choose a printer, select inches or millimeters, or set other printing preferences. Click Print. Be sure you have adjusted the Real Size setting for your personal computer in the Appearance tab of 6D™ Configure, to ensure your templates are correctly sized.
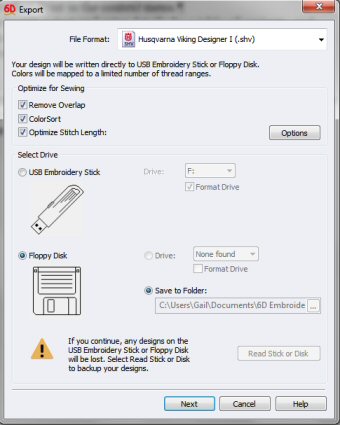
You can create a copy of an embroidery in another format using the Convert feature of Windows® Explorer. Select one design or several, then right-click. From the context menu, select 6D™ Embroidery > Convert. Select one of the 13 popular file formats. If selecting the .vp3 format, you can change the thread range, add trims and notes. Click OK. (6D™ Embroidery Machine Communication owners may only convert to .vp3.) Select whether to copy to a Floppy or USB drive. Click Next, then OK.

With your machine connected to your computer via a USB cable, you can send designs directly to the machine using Send or Send Express. Select a design then right click.
Hold the cursor over 6D™ Embroidery and then click Send Express  to send the design to your screen of your embroidery machine.
Use Send to send your design or a group of designs to the
MyFiles or the Personal Files folder of your connected embroidery machine. Multiple files can only be sent using the Send function.
to send the design to your screen of your embroidery machine.
Use Send to send your design or a group of designs to the
MyFiles or the Personal Files folder of your connected embroidery machine. Multiple files can only be sent using the Send function.
Would you like to send a design to your USB stick like you used to do in 5D™ or 4D™ Embroidery? The great part about using Windows® Explorer to do this is you don't need your dongle, you can send more than one at a time, and it keeps the name of the design. Select one or several designs then right-click, select Send to, then click on your USB device. It's very easy!
Technique Tune-Up
Technique Tune-Up
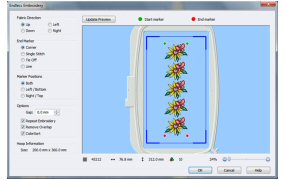
You can repeat embroideries as many times as you wish to fill your hoop, and stitch in a continuous sequence, creating an "Endless" embroidery. You can make any design endless in the 6D™, 5D™, and 4D™ Embroidery System software.
In 6D™ Embroidery / Extra  the Endless Wizard is found on the Wizards tab. The look has changed, but the function has a similar effect.
In 5D™ Embroidery / Extra and 4D™ Embroidery / Extra, the Endless function is found on the Design Page of the control panel. Adjust the gap to create the perfect spacing,
and choose from four types of alignment stitches for easy re-hooping.
the Endless Wizard is found on the Wizards tab. The look has changed, but the function has a similar effect.
In 5D™ Embroidery / Extra and 4D™ Embroidery / Extra, the Endless function is found on the Design Page of the control panel. Adjust the gap to create the perfect spacing,
and choose from four types of alignment stitches for easy re-hooping.
 QuiltDesign Creator
QuiltDesign Creator
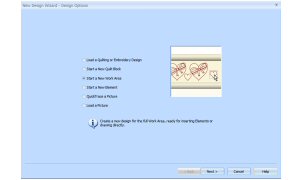
Have you ever wondered what the difference is between an Element and a Work Area? A Work Area consists of one or more elements or designs. You can think of the Work Area as the project and the Element as a part of the project.
An Element is defined by a Width and Height while a Work Area is defined by the Fabric Width and Machine Reach. For an Element the maximum width and height are 39.37" (1m). For an Area the maximum Machine Reach is 39.37" (1m) and the maximum Fabric Width is 196.85" (5m).
Create an element from a picture automatically or by drawing stitches over a background. Insert elements on the work area and combine them or Encore to create a larger quilt block or project.
Fun Facts to Know and Tell
Did you know that there are 22 SuperDesign categories and over 520 designs to choose from in 6D™ Embroidery / 6D™ Embroidery Extra? SuperDesigns are special designs that can be resized with constant stitch density. The designs' stitch properties can also be adjusted until they are set as embroideries.
Best wishes from 6D™
P.S. Watch for the 6D™ Embroidery Software newsletter next month as we share information on how to work with layers!

VANTAGE™ Embroidery Software Support is a membership program which provides education and support of the HUSQVARNA VIKING® & PFAFF 6D™ and 5D™ Embroidery Systems, QuiltDesign Creator and TruEmbroidery™ Software for Mac® computers. The VANTAGE™ program is currently available in the US, Canada, and Australia. Please visit your authorized HUSQVARNA VIKING® or PFAFF® dealer to learn more and sign up today.
This month with VANTAGE™ Embroidery Software Support features Mastering Your Embroidery Software: "Doodling to Create Your Next Masterpiece". In the Technology Corner, VANTAGE™ members will explore "Security Hints and Tips".

#275 Traveller (920401096)
Personalize and make your very own traveler's kit with this collection! This HUSQVARNA VIKING® collection (available next month) includes 16 embroidery projects and 60 travel-related designs to make luggage tags, passport/ticket covers, sleeping masks and much more. Hoop sizes vary from 80mmx80mm to 360mmx200mm.

#475 Brilliant Blocks & Borders (821072096)
Stylize your home decor, garments or bags with these beautiful Quilt motifs in Trapunto Style. This new PFAFF® collection (available next month) contains 42 designs. Combinations include 8 endless embroideries, 8 with position stitches for all-over-embroidered fabric and 8 with position stitches for top to bottom matching.