
Inspired Icons
Inspired Icons
While creating a design in 6D™ Design Creator  , have you ever wanted to change the stitchout order?
You can do that easily with the Layout Order tools. Let's see how they work.
, have you ever wanted to change the stitchout order?
You can do that easily with the Layout Order tools. Let's see how they work.
For example, in the design pictured, the stitchout order would be more appropriate if Object 2 stitches last.
Simply click Move to Front of Design  or select Object 2, then drag it to the bottom.
The Layout Order buttons are used to move objects within the FilmStrip.
- Move Forwards
 brings the object one step down the FilmStrip.
 - Move Backwards
 brings the object one step up the FilmStrip.
 - Move to Front places the object at the bottom of the FilmStrip or Group.
- Move to Back
 places the object at the top of the FilmStrip or Group.
These tools are the same in the 5D™ software. In the 4D™ software the drag feature is the only option available.
Module Mystique
Module Mystique
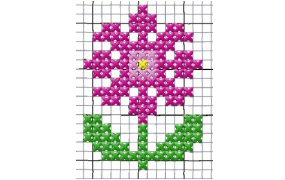
The 6D™ Cross Stitcher  module is a great way to take your cross stitch charts and turn them into embroideries in minutes.
When you open 6D™ Cross Stitcher module, select the second option: Load Picture for New Cross Stitch Design.
module is a great way to take your cross stitch charts and turn them into embroideries in minutes.
When you open 6D™ Cross Stitcher module, select the second option: Load Picture for New Cross Stitch Design.
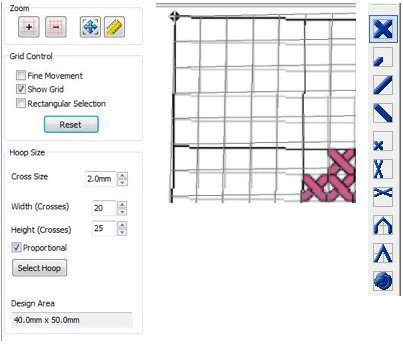
Choose the size of the cross, then enter the number of squares on your chart in the Width and Height boxes. Remove the checkmark from Fine Movement and Rectangular Selection. Zoom in on one corner. Move the grid of the software to match the grid of the chart. Continue for each corner.
Now you can use the cross stitch tools on the left side of the screen paired with the appropriate color on the right side of the screen to click in each square of the chart. No need to worry about the order you click the squares, the software will determine the best order to stitchout for you.This process is the same in the 6D™, 5D™, and 4D™ Embroidery Systems.
Technique Tune-Up
Technique Tune-Up

In 6D™ Embroidery / Extra  you can select corners, flourishes, frames and side pieces to place around your embroidery.
To create a Frame, select the Frame tab in the ribbon bar at the top of the window and choose one of these four categories.
you can select corners, flourishes, frames and side pieces to place around your embroidery.
To create a Frame, select the Frame tab in the ribbon bar at the top of the window and choose one of these four categories.
After choosing from corners, flourishes, frames and side pieces, select a set, and select a design. Place the item around your embroidery, or anywhere on the work area.

To create the design shown, load the Soccer embroidery design from Samples/6DEmb/Stitch2/Leisure into the work area. Add the team name using the Circle Counter-Clockwise Line Type. Be sure to select both elements and then go to the home tab and select Combine All before you create your frame! Open the Frame tab and choose frames from the pop-up menu. Choose the Appliqué Shields 1 frame set by clicking the arrow to the right of the set pop-up menu. Then Select frame 1 and set the margin to 0.5". Finally, click Apply in the Frame window to view your framed embroidery. Use the Design Player to see how the design stitches out.
In the 5D™ Embroidery System you would go to the Frames tab of the control panel. In the 4D™ Embroidery System, frames only exist in the Monogram Wizard or the 4D™ Family Portrait module.
 QuiltDesign Creator
QuiltDesign Creator
When creating an edge to edge pattern for the quilt frame using the automated quilter, you only need to create one repeat and the size doesn't matter. The automated quilter will resize and duplicate based on the quilt area you set once at the frame.
If you are creating a pattern to be printed on paper to trace with a laser pointer, you will need to create one repeat
then Encore  the design before printing out.
Let's start by creating one repeat of the pattern.
the design before printing out.
Let's start by creating one repeat of the pattern.
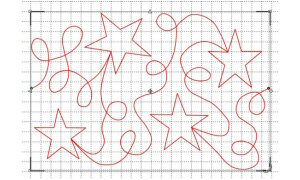
Choose Start a New Element. Set the height and width to the size of one repeat. You can draw your design freehand, bring in a background picture to
trace or QuickTrace  , or use
built-in designs, Shapes
, or use
built-in designs, Shapes  , or MiniPics
  .
This design was created with the star shape (number 18) and loops.
Make sure you start and stop on the same horizontal level.
.
This design was created with the star shape (number 18) and loops.
Make sure you start and stop on the same horizontal level.

If you are sending to an automated quilter, simply Export as a Quilting Design  . If you plan to print out the design, copy the design to a New Work Area the width of your quilt top.
Ensure the design is selected, then Encore the design. The software will determine the number of repeats that will fit the quilt top.
If the size isn't exact, simply stretch it to fit by dragging one of the selection corners outwards. Print your template, tape the pages together,
and you are set to quilt across the width of your quilt.
. If you plan to print out the design, copy the design to a New Work Area the width of your quilt top.
Ensure the design is selected, then Encore the design. The software will determine the number of repeats that will fit the quilt top.
If the size isn't exact, simply stretch it to fit by dragging one of the selection corners outwards. Print your template, tape the pages together,
and you are set to quilt across the width of your quilt.
Fun Facts to Know and Tell
Did you know that there are two methods that 6D™ Embroidery can split designs for use in multi-part hoops, Intelligent and Straight Line? When Intelligent is used the software decides how to best split the design going between design elements whenever possible. Straight Line simply splits the design.
Best wishes from 6D™
P.S. Watch for the 6D™ Embroidery Software newsletter next month as we share information on resizing versus scaling and working with backgrounds.

VANTAGE™ Embroidery Software Support is a membership program which provides education and support of the HUSQVARNA VIKING® & PFAFF 6D™ and 5D™ Embroidery Systems, QuiltDesign Creator and TruEmbroidery™ Software for Mac® computers. The VANTAGE™ program is currently available in the US, Canada, and Australia. Please visit your authorized HUSQVARNA VIKING® or PFAFF® dealer to learn more and sign up today.
This month with VANTAGE™ Embroidery Software Support features Mastering Your Embroidery Software: "Digitizing Techniques for Puffy Foam". In the Technology Corner, VANTAGE™ members will explore "Searching for Designs and Images".

#277 Cute and Cuddly (920405096)
Choose from 5 adorable projects, in the hoop, and 11 pop-up-embroideries with fun animals for your children or grandchildren! This HUSQVARNA VIKING® collection (available next month) gives you so many great options to embellish clothes, blankets and/or bags. Hoop sizes vary from 240mmx150mm up to 360mmx250mm.
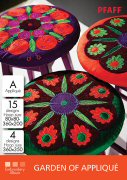
#476 Garden of Appliqué (821073096)
Give your home a new look with these great embroideries. Update your living room, renew your garden furniture or make yourself a fun beach bag with this new PFAFF® collection (available next month). Includes 4 Grand Dream embroideries with appliqué and 15 matching designs in hoop sizes from 80mmx80mm to 360mmx200mm.