
Inspired Icons
Inspired Icons
Alignment tools allow you to arrange designs with precision. Embroideries can be arranged using a variety of options including Center in Hoop and Move into Hoop as well as the various options for both horizontal and vertical alignment.
All of the alignment tools can be found in both the 6D™  and 5D™
  Embroidery modules.
The most commonly used alignment tool, Center in Hoop
Embroidery modules.
The most commonly used alignment tool, Center in Hoop  is also available from the Modify Tab within the
Control Panel in 6D™/5D™ Stitch Editor Plus
is also available from the Modify Tab within the
Control Panel in 6D™/5D™ Stitch Editor Plus  as well as 5D™ Stitch Editor.
Different functions are available at different times depending upon what is selected in the work area.
You can use the Center in Hoop function with a single embroidery design and
the Move into Hoop  function with single or multiple embroideries.
The Vertical and Horizontal Alignment functions do however require you to have multiple embroideries selected.
function with single or multiple embroideries.
The Vertical and Horizontal Alignment functions do however require you to have multiple embroideries selected.
The Center in Hoop function allows you to move the selected embroidery into the middle of the selected hoop.
The Move into Hoop function allows you to move any selected embroideries located outside the stitchable area of the hoop to
just inside the edge. This
is great for creating embroideries which take advantage of the entire hoop area.
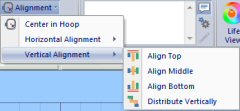
There are four Vertical Alignment and four Horizontal Alignment functions. You can align embroideries using the top, bottom, left or right edges, center them vertically or horizontally. In addition to lining things up the two additional functions will assist you for spacing. You can distribute the embroideries vertically and/or horizontally and the excess space between the selected embroideries is adjusted equally.
In the 6D™ Embroidery System the Alignment functions are found on the Home tab in the Layout section. The Horizontal and Vertical options are located in the Alignment drop-down list.
In the 5D™ Embroidery System you can find the alignment tools in the Center in Hoop drop-down list. Position your mouse over each icon to find out what it does.
Module Mystique
Module Mystique
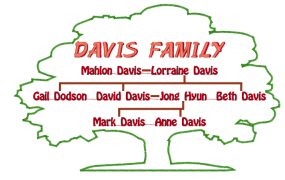
Make one-of a kind embroidered charts, quilt blocks and album pages automatically from your own family history with 6D™/5D™ Family Tree or 4D™ Family Portrait. (The tree outline for the Davis chart is a SuperDesign available only in 6D™ Embroidery).
Enter your family details or import gedcom files (.ged) from other genealogy software. Embroider the information and or photographs for each person or family group.
The wizards include one to help you add family info. There are also wizards to create PhotoStitch embroideries  and album pages or quilt blocks
  with lettering, frames and more! You can create embroidered charts automatically from your
family info
with lettering, frames and more! You can create embroidered charts automatically from your
family info  and customize the lettering,
colors and decorative embellishments for your chart with the theme wizard
and customize the lettering,
colors and decorative embellishments for your chart with the theme wizard  .
.
Technique Tune-Up
Technique Tune-Up
Did you know that the software splits your designs automatically for multipart hoops upon Export? Don't have a Multipart Hoop? Don't worry. Using the tools available you can dream big and fit it to your hoop later.
Option 1: Multipart hoops
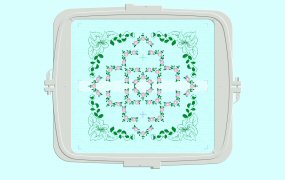
Start by creating your embroidery in a multipart hoop. This example shows a design created using a variety of SuperDesign elements that have been perfectly spaced using the Encore and Alignment functions available in 6D™ Embroidery. In 5D™ Embroidery you could use the MiniDesigns and 4D™ Embroidery has some of the same elements called Shapes.
In 6D™ Embroidery you would Export  the finished embroidery file because it is now ready to sew.
In 5D™ Embroidery you would Save
the finished embroidery file because it is now ready to sew.
In 5D™ Embroidery you would Save  the file.
When reopening the embroidery you will see it has been split automatically according to your Export/Save settings. Use the Intelligent or Straight Line Split settings depending on your preference. There is no need to ensure each embroidery element is located in one or the other stitch area of the hoop; just place your embroideries in the most pleasing arrangement
the file.
When reopening the embroidery you will see it has been split automatically according to your Export/Save settings. Use the Intelligent or Straight Line Split settings depending on your preference. There is no need to ensure each embroidery element is located in one or the other stitch area of the hoop; just place your embroideries in the most pleasing arrangement
In 4D™ Embroidery system you need to make sure each design element fits within one or the other side of the hoop as there is no splitting function. Once all the elements are positioned correctly you would save your embroidery. The save process combines the elements on one side of the hoop as one file and the other side as the second file resulting in two embroidery files for the overall design.
In both the 6D™ and 5D™ Embroidery Systems the Straight Line Split cuts the embroidery straight across the center line of the overlap zone. Intelligent Split cuts through the minimum number of stitches and minimizes cuts through solid areas of stitching. Tolerance keeps the stitches a short distance from the edges of the overlap. This allows you to move a design slightly when going from one hoop area to another to align a turned hoop to stitch out the other side of the embroidery.
Option 2: Think big, then cut
Do you want to create designs larger than your largest hoop? There are two ways to split your designs, the Split Project Wizard in the 6D™/5D™
Embroidery Extra module or using the 6D™/5D™/4D™ Design Aligner  modules.
Use the Split Project Wizard
modules.
Use the Split Project Wizard  when you want the software to do all the work.
Use 6D™/5D™/4D™ Design Aligner when you want a more precise split of the design into multiple designs.
when you want the software to do all the work.
Use 6D™/5D™/4D™ Design Aligner when you want a more precise split of the design into multiple designs.
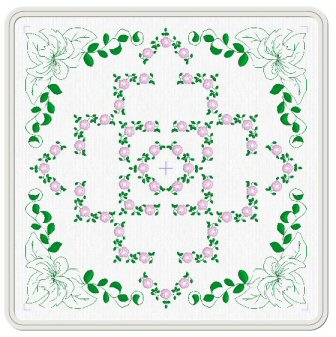
Start by creating a design in a hoop larger than any your embroidery machine may handle. The example design was created in a 16" (400mmx400mm) square hoop using 6D™ SuperDesigns with Encore and Alignment tools.
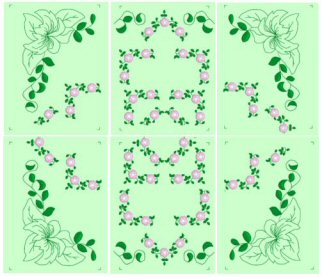
Start the Split Project Wizard filling in the information requested, such as the hoop you want to use when stitching out the split design and the type of alignment marks
you would like to use during stitch out. Save the split designs and the program will name each section "01", "02", "03" etc in front of the name you give it.
Then print out any worksheets you may need to assist you when sewing. It's that simple. This is how the Split Project Wizard splits the design into 6 hoopings:
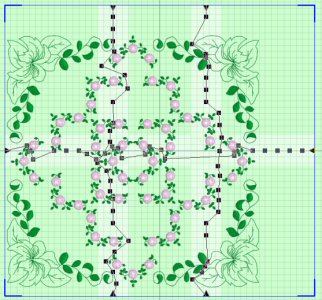
Or, you can take that large design to the 6D™/5D™/4D™ Design Aligner module, available as part of Design Enhancer or the top software package.
In this module you have complete control over splitting designs by moving markers through the design to guide the line exactly where you want it to cut.
Once you are satisfied with the way it will split, click Split Design  , then Export/Save and print out any worksheets. Using 6D™/5D™/4D™ Design Aligner there are only
two elements with cut lines that need to be matched. With the Split Project Wizard there are seven.
, then Export/Save and print out any worksheets. Using 6D™/5D™/4D™ Design Aligner there are only
two elements with cut lines that need to be matched. With the Split Project Wizard there are seven.
 QuiltDesign Creator
QuiltDesign Creator
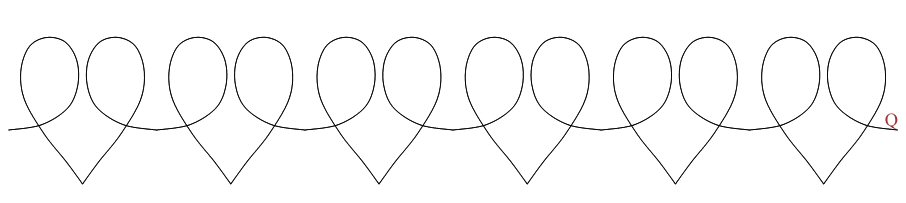
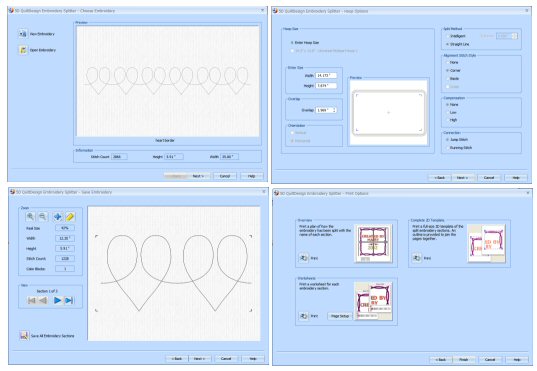
Do you want to quilt the borders for your next project on your embroidery machine? It is so easy to create a border design using Encore options in your QuiltDesign software, then split it for any hoop!
First, create a border design using the Encore  options. Then Export it as an Embroidery Design
  and
QuickLink to the QuiltDesign Embroidery Splitter
and
QuickLink to the QuiltDesign Embroidery Splitter  module.
Click through the easy to follow Wizard. Once you have saved the files you are ready to stitch your border with alignment marks for easy positioning.
module.
Click through the easy to follow Wizard. Once you have saved the files you are ready to stitch your border with alignment marks for easy positioning.
Fun Facts to Know and Tell
Did you know that the 6D™ Embroidery software system supports the use of many different Multipart hoops. These include the HUSQVARNA VIKING® Designer Majestic™, PFAFF® creative Grand Dream™, Brother Jumbo Frame, & Janome Giga Hoop.
Best wishes from 6D™
P.S: Watch for the 6D™ software newsletter next month as we share information on how to search for your embroidery designs using Windows® Explorer and how to speed this up with notes!

VANTAGE™ Embroidery Software Support is a membership program which provides education and support of the HUSQVARNA VIKING® & PFAFF 6D™, 5D™ and 4D™ Embroidery Systems, QuiltDesign Creator and TruEmbroidery™ Software for Mac® computers. The VANTAGE™ program is currently available in the US, Canada, and Australia. Please visit your authorized HUSQVARNA VIKING® or PFAFF® dealer to learn more and sign up today.
This month with VANTAGE™ Embroidery Software Support features Mastering Your Embroidery Software: "Perfect Circles". In the Technology Corner, VANTAGE™ members will explore "Advantages of Touch Screen Technology".
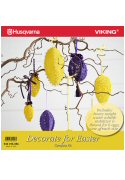
Decorate for Easter (920395096)
Easter is almost here! This new HUSQVARNA VIKING® kit (available this month) is an Easter delight with lovely lace eggs. The kit includes heavy weight water soluble stabilizer & thread for 6 eggs, and 8 designs for egg covers. Designs are for hoop size up to 180x130mm / 5"x7", and combined files for the 240mmx150mm / 9.6"x6" hoop are also included.

#472 Delicate Lines (821067096)
Create beautiful pieces with delicate lines! This PFAFF® collection (available from next month) offers you 40 exquisite designs. You'll be able to make stunning home décor with these beautiful embroideries. When embroidering, use the creative™ PETITE SQUARE HOOP 80x80mm / 3"x3".